
26 posts tagged with "SDK"

View All Tags
← Back to the liblab blog

As engineers, we often prioritize scalability, elegance, and efficiency in finding solutions. We despise monotony, tedious tasks, and boring work that consume our time. It becomes especially frustrating when we identify a tool that can reduce effort and produce better results, only to be turned down by management. This article will guide you on how to effectively communicate your tool request to management, increasing the chances of getting a 'Yes' for your proposal.

You’re Not Asking The Right Way

You may find it obvious why the tool you recommend is a great investment. It saves time, improves results, and allows you to focus on high-return activities for your organization. However, management doesn't always grasp these benefits. Why is that?

The reason lies in how you present your case. Management is primarily concerned with the organization's Profit and Loss (P&L). Their role is to maximize revenue while minimizing costs. When you propose a tool, simply highlighting time savings or improved output these don’t necessarily resonate. They are one step removed from what truly matters to management. Unless you can quantify the impact of the tool on P&L, management will perceive it as an "additional cost."

Show Impact on P&L

So, how can we translate the "additional cost" into improving the P&L? It's actually quite straightforward. While there will be an initial cost associated with the tool, evaluating it in isolation is not a fair assessment of the P&L impact. To present the impact properly, you need to calculate the additional revenue generated by the tool or the opportunity cost of not having it. The sum of the additional revenue (Rev_gen) and the opportunity cost (Opp_cost) subtracted from the tool cost will quantify the impact on the P&L.

PL_impact = Rev_gen - (Tool_cost - Opp_cost)

Provided you can demonstrate that investing in your tool will result in a positive PL_impact (> 0), management should find it an easy decision to support.

How To Calculate P&L Impact

Now that we know what needs to be quantified (Rev_gen and Opp_cost), let's discuss the general methodology used to quantify them.

  1. Identify the input parameters required to calculate Rev_gen and Opp_cost.
    • Write down the expression that dictate the calculations for each parameter. Assumptions are acceptable and often expected.
  2. Build a simple model (a spreadsheet, no LLM required 😉) to calculate Rev_gen and Opp_cost based on the input parameters.
  3. Present the calculations in a straightforward and simple manner. It's crucial to show all the math. It should be laid out so simply, that even a middle schooler can follow the logic.

Example - Calculating Opportunity Cost

In the following example we will show how we at liblab calculate the opportunity cost associated with building and maintaining SDKs for an API manually. This allows us to enable our customers to show that leveraging liblab’s products & services are a fraction of the cost of tackling the problem yourself (we assume a Rev_gen of 0, for simplicity sake)

Opp_cost = APIs * Num_SDK * Cost_build+maintain_per_SDK
  1. Input Parameters

    1. APIs = Number of APIs your organization needs SDKs for
    2. Num_SDK: Number of SDK languages you need to support for your APIs
    3. Cost_build+maintain_per_SDK can be further broken down into:
      1. Cost_build/SDK: Engineering cost per SDK build
        1. Cost ($) / Hour derived from engineering salary
        2. Hours / SDK Build (assumption based on your organization's API complexity)
      2. Cost_maintain/SDK: Engineering cost per change and number of changes
        1. Cost ($) / Hour derived from engineering salary
        2. Hours / SDK Build (assumption based on your organization's API complexity)
        3. Update Frequency (assumption on how often your API changes)
  2. Model calculating Opp_cost based on input parameters:

    1. The reason we want to put this in a spreadsheet model vs. just writing the equations and answers out is because it makes it easy for management to see the end result, if they don’t agree with one of your assumptions - most of the times this won’t change the decision on the tool but will help deal with any objections they may have.
    2. See models governing equations below:
    Opp_cost = APIs * Num_SDK * (Cost_build + Cost_maintain) per SDK
    Cost_build/SDK = Cost_hr * Hrs_build
    Cost_maintain/SD = Cost_hr * Hrs_maintain * Update_frequency
  3. Present the Math Simply - Below is a screenshot of our liblab Investment Calculator

    1. This calculator depicts the investment needed by an average liblab customer if they are to build and maintain SDKs across 6 languages themselves for a single API.

SDK Investment Calculator

As you can see, the cost of building and maintaining SDKs for our average customers exceeds $100K. Making the cost of liblab’s product and services a fraction of the opportunity cost, resulting in very good return and positive impact on P&L.

Conclusion

To obtain a "Yes" from management for the tools you need, demonstrate through a model how they will have a positive impact on the P&L.

At liblab, we have created a calculator that helps developers articulate the cost savings of using our services to management. Not to mention the additional impact a better developer experience can have on their business (not quantified in our calculator).

If you're interested in receiving a free estimate of your annual API SDK investment, reach out to us via our contact form and mention "Free SDK Investment Assessment" in the message field. We'll respond promptly and provide you with a customized report breakdown, similar to the example above, tailored to your organization.

← Back to the liblab blog

Software development can be a complex and daunting field, especially for those who are new to it. The tech world's jargon and acronyms can be confusing to newcomers. You may have heard the term “SDK.” But what exactly is an SDK, and why is it important for software development?

More specifically, how can an SDK, when applied to an API, create huge benefits for your API management?

In this article, we'll take a closer look at what an SDK is and why it's an essential tool for developers looking to create high-quality software applications. You'll also come away with a clear understanding of the benefits SDKs have on API management, for both API owners and end users.

What is an SDK?

An SDK (software development kit) is a programming library made to serve developers and the development process.

A good use case for SDKs are APIs, the application programming interfaces that allow two programs, applications or services to communicate with each other. Without an SDK, a developer has to access the API via manual operations. Whereas with an SDK, developers can interact with the API using pre-built functionality, enabling quicker and safer software development.

How to Use SDKs for APIs

An API is the interface of an application by which a developer can interact directly with that application. An SDK provides tools that help a developer interact with the API.

To emphasize how using an SDK is different from interacting with an API via “manual operations,” we will juxtapose calling The One API to find a book with both methods below.

Calling The One API via Manual Operations

We will call The One API via a BASH script and JavaScript fetch method — both “manually.”

curl   -X GET https://the-one-api.dev/v2/book/1264392547 \
2 -H "Accept: application/json" \
3 -H "Authorization: Bearer THEONEAPISDK_BEARER_TOKEN"

This is a very basic way to query a server. It is available straight out of the terminal and gives you a way to describe the network request using arguments to one big command.

Explanation about the command:

  • curl ****the command for BASH to transfer data.
  • -X debugging mode, allows BASH to be more verbose.
  • GET is the method.
  • -H is a header option.

In other words: transfer data , do it with a get, and pass the headers Accept: application/json, Authorization: Bearer

JavaScript Fetch Method

async function fetchData() {
try {
const url = 'https://the-one-api.dev/v2/book/123';
const res = await fetch(url, {
headers: {
Authorization: `Bearer 12345`,
},
});

if (!res.ok) {
throw new Error(res.statusText);
}

const data = await res.json();
console.log(data);
} catch (error) {
console.log('error', error);
}
}

This is the most basic way to query a server with JavaScript. What you see here is an asynchronous function that queries the server, converts the request to JSON format and then logs the data it produced.

It is better than bash because:

  • Readability: Instead of arguments to one long command, you'd use an object which is more human-readable and less error-prone.
  • It handles an error. Instead of just logging the error, the try/catch block allows you to handle the situation where an error occurred.

Calling The One API via an SDK

import { TheOneApiSDK } from './src';

const sdk = new TheOneApiSDK(process.env.THEONEAPISDK_BEARER_TOKEN);

(async () => {
const result = await sdk.Book.getBook('123');
console.log(result);
})();

Notice that the SDK client allows us to use the book controller and getBook method to query the API. We set the headers when we instantiated the clients and we were ready to query the API. This approach is much easier to read and less error-prone.

This example is different from the two mentioned above because the user did not write the http request.

The http request is actually made behind the scenes (might be written with JS fetch too) by the maintainer of the SDK; this allows the maintainer to decide:

  • What network protocol is going to be used.
  • What is the destination of the network request.
  • How the headers should be set for the network request.
  • Readability: It's very clear which action the user wants to achieve, what is the controller, etc.

Who Benefits from SDKs?

There are many benefits to using an SDK. For the end users, it allows safer and cleaner access to the API. For the owners it ensures the API is used correctly and keeps support costs down.

SDK can reduce costs in many ways, including:

Retry strategy. When writing an SDK, you can add logic that prevents an SDK client from keep trying to query the API, therefore preventing unwanted calls to the API

Better use. Because the user does not query the API directly, the API receives better calls or more standardized input from its clients.

Speed up development. The SDK clients enjoy faster development because the requests from the server are standardized.

Code maintenance. When querying the API directly, you need to keep up with every update the API has done. Using an SDK facilitates this interaction and keeps up with the updates of the API. You do, however, need to keep your SDK up to date.

An SDK benefits the API user by:

  • Better understanding how to use an API through semantically-named functions, parameters and types.
  • Making it easier to invoke methods as they become readily available/discoverable via internal development environments (IDE)
  • Provides easier API access, with simple functions and parameters.
  • Prevents bad requests, and allows the user to correct their input.

An SDK benefits the API owner by:

  • Ensuring the required inputs from the user are in every request.
  • Preventing wrong inputs from being sent to the API server via enforcing types and validations.
  • Having an additional layer of validations to enforce response patterns. For example, if a user is sending too many requests, the SDK can warn and stop the user as they approach their limit.

Conclusion

Many API owners don't provide SDKs because of the difficulty and the development time involved with creating one, not to mention the onerous task of maintaining them. An API can have dozens or even hundreds of endpoints, and each one requires a function definition.

← Back to the liblab blog

An SDK is a set of software development tools that enable developers to create applications for a specific software platform or framework. In the context of APIs, an SDK typically includes libraries, code samples, and documentation that simplify the process of integrating the API into an application.

Offering your developers a good SDK will increase the adoption of your APIs and provide the necessary safeguards for how to access them.

Why is adding an SDK to your API beneficial?

Here are some of the reasons why adding an SDK to your API is beneficial:

Reduce Development Time and Complexity

By providing an SDK, you can significantly reduce the time and effort required to integrate your API into an application. The SDK provides pre-built code libraries that developers can use to quickly and easily interact with your API, reducing the amount of time they need to spend coding and debugging. If you provide your developers only with an API, they will need to define things like auth logic, pagination, error handling, and other complex logic. This can be built-in into your SDK so developers can implement your API within one line of code.

For example, instead of storing pagination tokens and asking your developers to implement their own logic, they can simply use something like mySDK.getData(skip: 10).

Improved Developer Experience

When you provide an SDK, you're not just providing code libraries; you're also providing documentation and code samples that help developers understand how to use your API effectively. This makes it easier for developers to integrate your API into their applications and reduces the likelihood of errors or issues arising during development. IntelliSense and code suggestions will improve the DevEx of your API by giving your developers information about the available calls they can make. Built-in documentation guides developers on what to expect (request/response) in each API call.

SDK Auto completion

Increased Adoption

When you make it easier for developers to use your API, you increase the likelihood that they will actually do so. This can help to drive adoption of your API and increase its overall usage. If you want to increase your API adoption, offering SDKs will help.

Easier Maintenance and Upgrades

When you provide an SDK, you have more control over how developers interact with your API. This makes it easier to make changes or upgrades to your API without breaking existing applications that use it. By providing an SDK, you can ensure that developers are using your API in a consistent and supported way, which can reduce the risk of issues arising.

Better Security

An SDK can also help to improve the security of your API. By providing pre-built code libraries, you can ensure that developers are using secure coding practices when interacting with your API. This reduces the likelihood of security vulnerabilities arising due to coding errors or mistakes. You can also catch API errors in the SDK and have client-side logic to handle it. Retries are an example of how you can throttle the API access in event of errors.

Conclusion

Adding an SDK to your API can provide significant benefits for both developers and API providers. It simplifies the integration process, improves the developer experience, increases adoption, makes maintenance and upgrades easier, and improves security. If you're developing an API, consider providing an SDK to help developers integrate your API more easily and effectively.

Building true idiomatic SDKs in multiple languages takes time and knowledge. Here at liblab, we offer it as a simple, fast straightforward service. Give liblab a try and check how we can automatically build SDKs for your API in seconds, not months.

← Back to the liblab blog

This post will take you through the steps to write files to GitHub with Octokit and TypeScript.

Install Octokit

To get started we are going to install Octokit.

npm install @octokit/rest

Create the code

Then we can create our typescript entry point. In this case src/index.ts

import { Octokit } from '@octokit/rest';
const client = new Octokit({
auth: '<AUTH TOKEN>'
});

We instantiate the Octokit constructor and create a new client. We will need to replace the <AUTH TOKEN> with a personal access token from GitHub. Checkout the guide to getting yourself a personal access token from GitHub.

Now that we have our client setup we are going to look at how we can create files and commit them to a repository. In this tutorial I am going to be writing to an existing repo. This will allow you to write to any repo public or private that you have write access to.

Just like using git or the GitHub desktop application we need to do a couple of things to add a file to a repository.

  1. Generate a tree
  2. Commit files to the tree
  3. Push the files

Generate a tree

To create a tree we need to get the latest commits. We will use the repos.listCommits method and we will pass an owner and repo argument. owner is the username or name of the organization the repository belongs to and repo is the name of the repository.

const commits = await client.repos.listCommits({
owner: "<USER OR ORGANIZATION NAME>",
repo: "<REPOSITORY NAME>",
});

We now want to take that list of commits and get the first item from it and retrieve its SHA hash. This will be used to tell the tree where in the history our commits should go. To get that we can make a variable to store the commit hash.

const commitSHA = commits.data[0].sha;

Add files to the tree

Now that we have our latest commit hash we can begin constructing our tree. We are going to pass the files we want to update or create to the tree construction method. In this case I will be representing the files I want to add as an Array of Objects. In my example I will be adding 2 files. [test.md](http://test.md) which will hold the string Hello World and time.txt which will store the latest timestamp.

const files = [
{
name: "test.md",
contents: "Hello World"
},
{
name: "time.txt",
contents: new Date().toString()
}
];

Octokit will want the files in a specific format:

interface File {
path: string;
mode: '100644' | '100755' | '040000' | '160000' | '120000';
type: 'commit' | 'tree' | 'blob';
sha?: string | null;
content: string;
}

There are a couple of properties in this interface.

  • path - Where in the repository the file should be stored.
  • mode - This is a code that represents what kind of file we are adding. Here is a quick run down:
    • File = '100644'
    • ExecutableFile = '100755'
    • Directory = '040000'
    • Submodule = '160000'
    • Symlink = '120000'
  • type - The type of action you are performing on the tree. In this case we are making a file commit
  • sha - The last known hash of the file if you plan on overwriting it. (This is not needed)
  • content - Whatever should be in the file

We can map to transform our file array into this proper format:

const commitableFiles: File[] = files.map(({name, contents}) => {
return {
path: name,
mode: '100644',
type: 'commit',
content: contents
}
})

Now that we have an array of all the files we want to commit we will pass them to the createTree() method. You can think of this as adding your files in git.

const {
data: { sha: currentTreeSHA },
} = await client.git.createTree({
owner: "<USER OR ORGANIZATION NAME>",
repo: "<REPOSITORY NAME>",
tree: commitableFiles,
base_tree: CommitSHA,
message: 'Updated programatically with Octokit',
parents: [CommitSHA],
});

Afterwards we have the variable currentTreeSHA . We will need this when we actually commit the files.

Next we go to actually make a commit on the tree

const {
data: { sha: newCommitSHA },
} = await client.git.createCommit({
owner: "<USER OR ORGANIZATION NAME>",
repo: "<REPOSITORY NAME>",
tree: currentTreeSHA,
message: `Updated programatically with Octokit`,
parents: [latestCommitSHA],
});

Push the commit

Then we push the commit

await client.git.updateRef({
owner: "<USER OR ORGANIZATION NAME>",
repo: "<REPOSITORY NAME>",
sha: newCommitSHA,
ref: "heads/main", // Whatever branch you want to push to
});

That is all you need to do to push files to a GitHub repository. We have found this functionality to be really useful when we need to push files that are automatically generated or often change.

If you find yourself needing to manage SDKs in multiple languages from an API, checkout liblab. Our tools make generating SDKs dead simple with the ability to connect to the CI/CD tools you are probably already using.

liblab!

← Back to the liblab blog

Client libraries are shared code to avoid repetitive tasks. Engineers love client libraries. In iOS, libraries are also referred to as frameworks or SDKs. In this post, I’ll stick to using the term library.

I’ll show you a common pattern to build a library. Libraries are used everywhere.

If you think this is a daunting task, worry not! Keep reading and you’ll see it’s easier than you think.

The Library

The goal of this post will be to build a library that

  • Retrieves the latest price of a list of cryptocurrencies
  • The library is used in a sample app that shows these prices
  • You are ready to create your own library

The Sample Server API

In this example, I will use the CoinMarketCap API. With this API you can retrieve current and historic information about cryptocurrencies.

By checking their documentation, you will notice their API is extensive. For this post, only the v2/cryptocurrency/quotes/latest/ **endpoint **will be used.

Check out their Quick Started Guide to create your own API KEY. You will need one to make requests to their service.

Creating the Swift Package

Nowadays it is very simple to create a new library in Swift. In iOS, the modern way to publish and deliver libraries is via the Swift Package Manager. From here on out, I’ll walk you step-by-step on how to create the library.

My requirements are:

  • Xcode 13.4.1
  • The library will support iOS 10+

Create a new Xcode project. Make sure you select Swift Package as the project type.

Follow the instructions and you’ll decide where to save the project on your machine. I named the library MyCryptoCoinSwiftLibrary for this tutorial. After the project is created, notice the file named Package.swift.

// swift-tools-version: 5.6

import PackageDescription

let package = Package(
name: "MyCryptoCoinSwiftLibrary",
products: [
// Products define the executables and libraries
// a package produces, and make them visible to
// other packages.
.library(
name: "MyCryptoCoinSwiftLibrary",
targets: ["MyCryptoCoinSwiftLibrary"]),
],
dependencies: [
// Dependencies declare other packages that this package
// depends on.
// .package(url: /* package url */, from: "1.0.0"),
],
targets: [
// Targets are the basic building blocks of a package.
// A target can define a module or a test suite.
// Targets can depend on other targets in this package,
// and on products in packages this package depends on.
.target(
name: "MyCryptoCoinSwiftLibrary",
dependencies: []),
.testTarget(
name: "MyCryptoCoinSwiftLibrary Tests",
dependencies: ["MyCryptoCoinSwiftLibrary"]),
]
)

If you want to know more about each field in this file, take a gander at the Package Description site by Apple. Know that in a package, you can add resources like images and videos, and not just code. The library in this post is fairly simple because it only interacts with a server API.

I am removing the .testTarget from the list of targets. I will not focus on how to write unit tests for our library in this tutorial. Yet, unit tests are very important for a real library, you want make sure you doesn’t introduce critical bugs.

Because the library needs to connect with the CoinMarketCap API, a networking layer is needed. For that, our library will make use of the most famous networking library in iOS, Alamofire. In their documentation, there are instructions on how to add it as a dependency in our Package.swift, check out Almofire’s instructions here.

This sample library will only support iOS, so make sure to list it in the platforms field.

After those modifications, Package.swift now looks like this:

// swift-tools-version: 5.6

import PackageDescription

let package = Package(
name: "MyCryptoCoinSwiftLibrary",
platforms: [
.iOS(.v10)
],
products: [
// Products define the executables and libraries a
// package produces, and make them visible to
// other packages.
.library(
name: "MyCryptoCoinSwiftLibrary",
targets: ["MyCryptoCoinSwiftLibrary"]),
],
dependencies: [
// Dependencies declare other packages that this package
// depends on.
// .package(url: /* package url */, from: "1.0.0"),
.package(url: "https://github.com/Alamofire/Alamofire.git",
.upToNextMajor(from: "5.6.1"))

],
targets: [
// Targets are the basic building blocks of a package.
// A target can define a module or a test suite.
// Targets can depend on other targets in this package,
// and on products in packages this package depends on.
.target(
name: "MyCryptoCoinSwiftLibrary",
dependencies: ["Alamofire"], // Important so
// Alamofire can be used in your library.
path: "Sources"), // Short explanation: What
// you want the library to expose to the public.
]
)

After you add dependencies to your library, you should see them listed in your Xcode project. From here, the setup is done and all that is left is the code!

The code will be simple. I won’t overcomplicate the library with a complex design. There will be a struct called CoinRetriever that will expose only one function

public func latestPrice(
coins: [String],
completionHandler: @escaping (Result< Coins, AFError>) -> Void)

This expects to receive a list of coins to retrieve their latest price. For this tutorial keep it simple and stick with just supporting the cryptocurrency symbol, for example, “BTC”, “ETH”.

It will return the response with the block completionHandler. Notice that Coins is listed as the success value, and this is something that I’ll explain now.

Models

This function will call the CoinMarketCap API endpoint /v2/cryptocurrency/quotes/latest. As listed in their docs, a sample response is:

{
"data": {
"BTC": {
"id": 1,
"name": "Bitcoin",
"symbol": "BTC",
"slug": "bitcoin",
"is_active": 1,
"is_fiat": 0,
"circulating_supply": 17199862,
"total_supply": 17199862,
"max_supply": 21000000,
"date_added": "2013-04-28T00:00:00.000Z",
"num_market_pairs": 331,
"cmc_rank": 1,
"last_updated": "2018-08-09T21:56:28.000Z",
"tags": [
"mineable"
],
"platform": null,
"self_reported_circulating_supply": null,
"self_reported_market_cap": null,
"quote": {
"USD": {
"price": 6602.60701122,
"volume_24h": 4314444687.5194,
"volume_change_24h": -0.152774,
"percent_change_1h": 0.988615,
"percent_change_24h": 4.37185,
"percent_change_7d": -12.1352,
"percent_change_30d": -12.1352,
"market_cap": 852164659250.2758,
"market_cap_dominance": 51,
"fully_diluted_market_cap": 952835089431.14,
"last_updated": "2018-08-09T21:56:28.000Z"
}
}
}
},
"status": {
"timestamp": "2022-06-02T14:44:22.210Z",
"error_code": 0,
"error_message": "",
"elapsed": 10,
"credit_count": 1
}
}

Instead of parsing the JSON, a better approach is to create models that represent the response of the API.

From bottom to top, three models can be identified for this response.

Quote

public struct Quote: Decodable {
public let price: Double
}

Coin

public struct Coin: Decodable, Identifiable {
public let id: Int
public let name: String
public let symbol: String
public let quote: [String: Quote]
}

The only reason Coin extends Identifiable is because this model is used in the sample app. This model is the input of a List View. To simplify the classes that are used in this tutorial, the List View requires the model to be Identifiable.

In a real scenario, I would suggest creating an extra model or class that is used in the UI, to keep this one decoupled from the client logic.

Coins

public struct Coins: Decodable {
public let data: [String: [Coin]]
}

Notice that all the members of these models match a value from the API response. As an example, let’s say that Coin also cares about max_supply from the response, in that case Coin would look like

public struct Coin: Decodable, Identifiable {
public let id: Int
public let name: String
public let symbol: String
public let maxSupply: Int
public let quote: [String: Quote]

enum CodingKeys: String, CodingKey {
case id
case name
case symbol
case maxSupply = "max_supply"
case quote
}
}

This is to illustrate what is needed to support names that do not map between the response and the model members. No need to add it for this tutorial.

Requests

Now create the CoinRetriever struct and add the following code

import Alamofire // 1. Import dependency listed in Package.swift

public struct CoinRetriever {
private var apiKey: String; // 2. apiKey is needed for the
// CoinMarketCap API

public init(apiKey: String) {
self.apiKey = apiKey;
}

public func latestPrice(coins: [String], completionHandler:
@escaping (Result< Coins, AFError>) -> Void) {
let headers: HTTPHeaders = [ // 3. Headers needed by
// CoinMarketCap
"X-CMC_PRO_API_KEY": apiKey,
"Accept": "application/json",
"Accept-Encoding": "deflate, gzip"
]
let parameters: Parameters = ["symbol":
coins.joined(separator: ",")]
// 4. The parameter that this method will support.
// E.g. "BTC", "ETH"
// 5. Alamofire request to the endpoint, it decodes
// the value to the Coins model previously created
let endpoint = "https://sandbox-api.coinmarketcap.com" +
"/v2/cryptocurrency/quotes/latest"
AF.request(endpoint,
parameters: parameters,
headers: headers)
.responseDecodable(of: Coins.self) { response in
guard let coins = response.value else {
completionHandler(.failure(response.error!))
return
}
completionHandler(.success(coins))
}
}
}

Steps to make a request using Alamofire and decoding the response into the models.

  1. Import the dependency listed in Package.swift. This will be used to make the actual request to the API.
  2. CoinMarketCap needs an API KEY to authenticate its request, if you still don’t have one, read here how to get one.
  3. Apart from putting the API KEY in the headers, they also suggest adding extra headers.
  4. Check the endpoint docs to see what other parameters are supported. For this tutorial only “symbol” will be used.
  5. Alamofire does the request. It decodes the response as the Coins model created before.

Publish the library

This step is the simplest of all. SPM works with GitHub out of the box. All you need to do is upload the library project to a GitHub repository. In this case, I created the repo github/MyCryptoCoinSwiftLibrary. From here, it’s all about advertising your repo, which is out of the scope of this post.

Extra Step - A Sample App

As an extra step, you might be wondering how would someone use your new library. To demonstrate this, create a sample app.

In Xcode create a new iOS app. I named mine CryptoCoinSampleApp.

As a suggestion, add the sample app to the same directory where you created the library. This way you will include a sample app alongside your library as part of your repository.

Now the important step is how to add your library that now lives in github. As a matter of fact, this process is the same for any other library published through SPM.

In your Xcode app project, click on File → Add Packages (remember the Xcode version I used! this UI/menu can change in a different Xcode version).

I searched for the GitHub repo where the library was published, that’s how you will find yours too. In a production library, instead of using a specific branch to get the code from, the normal use case is to specify a release version, something like 1.0.0. By the time you are using this approach you should be more comfortable building libraries.

After this, your code will have access to your new library, and you can import it like this:

import MyCryptoCoinSwiftLibrary

Since the app itself is out of the scope of this tutorial, I will only point you to it in the github repository.

Play with it! Create a PR with a suggestion, create an issue in the repo, let me know what you think! Feel free to use the library as well in your own sample app!

The liblab way

As you work on this tutorial, you might notice that a lot of what was coded is very repetitive and tedious. At liblab, our goal is to automate this process. We have a product that will let you create what I explained in this tutorial in an automatic way for a lot of languages and different platforms.

You can sign up at liblab.com/join to start generating your own SDKs. Join our Discord to chat with us and other liblab users, and follow us on Twitter and connect with us on LinkedIn to keep up to date with the latest news.

← Back to the liblab blog

This post will look at what security options OpenAPI gives us, what companies big and small are actually doing, and what you should be doing when you build your own API.

  1. Maybe not Hacker News, but they have a special deal with Firebase to give people unrestricted access to the firehose. I put together a quick Hacker News OpenAPI spec for some testing

Security in the OpenAPI Spec

If you’re like me and you really dig formatting languages, you’re in for a good time because the OpenAPI Specification v3.1.0 is a treat. But if you don’t plan to add this to your nightstand for bed-time reading, this section will walk you through how security is defined.

There are five types of security, and three places to define it.

Five Types of Security in OpenAPI

In a Swagger 2.0 you had three types. OpenAPI dropped one and added three.

The five types in OpenAPI are: apiKey, http, oauth2, mutualTLS, and openIdConnect. The first three are the most commonly seen, and we’ll talk about them a lot in this post. The last two are new, and are rarely seen in the wild.

(The original three types in Swagger 2.0 were basic, apiKey, and oauth2. You can still define a basic authentication with OpenAPI, using type: http; scheme: basic, but that is not recommended for reasons we’ll talk about later.)

Where Security is defined in OpenAPI

There are three places to place security in an API spec.

Under #/components/securitySchemes

This is where you define your security options.

(Simpler APIs will normally only have one option.)

The key name is whatever you want, you’ll use it to reference this object from elsewhere in the spec. The only required parameter is type, which should be one of the five types we talked about above. The other parameters change depending on the type.

Here’s an example of an API that has two security schemes.

components:
securitySchemes:
myBearerAuth:
type: http
scheme: bearer
bearerFormat: jwt
myApiKey:
type: apiKey
name: key_name
in: header

Interesting side note: The securitySchemes in components is a bit of an odd duck. Most of the time, components is for reusable objects. If you find yourself writing an object again and again, you can put it in components, and just reference that component. But with security, the securitySchemes in components is the only place to define security; it has to be defined here.

Under #/security

This is the default security requirement to use for the whole API. This should match up to a named security scheme that was (or will be) defined in #/components/securitySchemes.

If this top level security object is missing, or if it’s an empty object, then this API will have no security by default. You can see this in a lot of smaller APIs that have a few open endpoints for everyone, but then define operation-specific security for the rest.

Here’s an example:

security:
- myApiKey: []

You might be wondering why there’s an empty array here. Good wondering! This array is for scopes, which are strings that let you define fine-grained security permissions. Often it’ll look like “read:foo” and “write:foo”. Oauth2, and it’s newer cousin openIdConnect, always take scopes, other security types may not.

This is a key/value pair, and the value is always an array. If you don’t have any scopes, then you have to have an empty array.

Under a specific operation

Just like above, we use one of the defined security schemes, but this time only for a specific operation on a specific path.

If there is no security defined for an operation, then the API will use the top-level default under #/security.

In this example, we use myBearerAuth for anyone who wants to get /users.

paths:
/users:
get:
security:
- myBearerAuth:
- 'read:users'
- 'public'

Here we’re using scopes. The user of the SDK has to have either a “read:users” or a “public” scope.

And that’s the last we’ll say about scopes.

Security in Practice

In practice, when hitting an endpoint, the security is sent out with the request using one of three methods. One of these is terrible, see if you can spot it.

  • Bearer — A token in the header, which is how OAuth is used. It looks like Authorization: Bearer tokenValue
  • API Key — A key/value pair that could be in the header, query, or even in a cookie, but the best practice is to put it in the header, and often looks like Authorization: apiKey apiKeyValue
  • Basic — A username/password in the header, in the clear. It looks like Authorization: Basic username:password.

Did you spot the terrible method? That’s right, it’s Basic. Don’t send around a username and password with every API call, it’s insecure. We’ll talk about recommendations later.

What API security are big companies using?

The big companies rarely have official and easy-to-find OpenAPI specs, so this information was mostly gleaned from their documentation portals.

Facebook uses OAuth2

Dropbox uses OAuth2

Twitter uses OAuth and OAuth2

GitHub uses OAuth2, and sometimes Basic Authentication, which is worrisome.

Microsoft Azure uses OAuth2, and recommends building your own apps similarly:

The results are unsurprisingly unanimous: big companies use OAuth2.

What API security are other companies using?

Getting info on lot of other companies is more difficult. Either we have to dive deeply into thousands of API documentation portals, or we can run some simple statistics on a collection of specs. This post will go the latter route.

Methodology

To do this, I’m turning to my favorite JSON Query tool: jq! Although in reality many specs are written in YAML, so we’ll have to turn to its YAML wrapper: yq!

Here’s the basic command.

yq '.components.securitySchemes' openapi.yaml

A good source of a OpenAPI specs is the OpenAPI Directory. It’s a well-maintained resource filled with thousands of specs. We’ll run some statistics on those.

To get some simple stats, I ran a series of UNIX commands on the spec in the OpenAPI Directory. They’re rough, but they work well enough to build our instincts. You can follow along at home.

# total number of files
find . -name "*.yaml" -print | wc -l

3771

# lets save some output, to look at it twice
find . -name "*.yaml" -print0 | /
xargs -0 -n24 -P4 yq '.components.securitySchemes' /
> out 2>/dev/null

# number of APIS without a securityScheme
grep ^null out | wc -l

2452

# ranked list
cat out | grep '"type":' | cut -d\" -f 4 | sort | uniq -c | sort -rn

980 apiKey
853 oauth2
177 http
2 openIdConnect

Now there’s one problem I know of right off the bat: these statistics are overwhelmed by a small number of companies with a lot of specs. Azure alone has 653 specs, each with multiple versions, for a total of 1,832 files in their subsection of this repo. It’s a classic power law distribution.

We’ll run this all again, but this time excluding the five largest offenders, so we only look companies with a smaller number of specs. There is still more cleaning up we could do, but this gets us most of the way to what we want.

(The actual Unix commands for this part are left as an exercise to the reader, mine were pretty messy.)

Here are the new results.

# number of APIS without a securityScheme
499

# ranked list
245 apiKey
123 http
88 oauth2
2 openIdConnect

Conclusions

Now this is interesting, but not too surprising.

OAuth2 is strong choice for authentication, but it’s also a difficult and complex framework; the IETF working group lost a key editor over that fact, and even people who spend a lot of time in the OAuth2 world will sometimes recommend against it. Conversely apiKey can be handled with simple home brewed solutions.

The http type is a more complex question. Everything depends on what comes next, in the scheme parameter. This parameter is required for http types, and has to be a registered scheme.

I did some quick manual checking of APIs with an http type, and I found a fairly even mix of two schemes: ****

  • “scheme: bearer” - This is passing a token in the headers. Often this is defined as a JWT token, which is a very modern and secure method.
  • “scheme: basic” - This is passing the username and password in the headers, and is basically insecure.OpenAPI specs that use this were sometimes using it as an option alongside other security schemes, but it was still unfortunate to see it at all.

Conclusions part 2, when security is missing

I did learn one big thing: at the beginning of this post I said, “Every API has security,” and now I know that many APIs do not, in fact, have security. If I included the “no security” in the pie chart it would have been 52% of the total.

To understand this problem more, I did some spot checks of specs without security.

  • Many were small projects, and they possibly were never meant to be used. I’m suspicious anytime I see a spec that was committed to GitHub with version 1.0.0 and then never touched again.
  • Some specs were written by enthusiasts for an existing but un-specced API, and it’s possible they just didn’t write a complete spec.
  • I saw one API that did have token-based security, but was only mentioned in the examples.
  • Amazon has their AWS OpenAPI vendor extensions, and specs that use them may not show up in my methodology.
  • There were a few specs that were autogenerated from other places, like protobufs, and it’s likely that something was lost in translation.

So what should you do?

Use OAuth2 if you can, apiKey if you want.

That’s it. That’s the recommendation.

For more details, keep reading. But you can stop here and be happy with what you’ve learned.

apiKey

In spite of having the word API in it, apiKey is technically no longer the best practice for APIs. Phil Karlton said that naming thing is one of the two hardest things in computer science, and this small irony is more proof of that.

But despite what the best practice people say, whoever they are, API keys are still a commonly-used method of security, and perfectly fine for many small APIs.

If you want to keep using your API key security make sure it’s submitted in the headers and not in the query string, that way they’ll be less likely to leak. (If you’ve been using GitHub API, you may have noticed they deprecated query tokens last year, after a series of deliberate “brown-outs” to get people off their butts.)

But even here there are exceptions. Cisco uses apiKey in a cookie that is obtained from a Single-Sign-On assertion.

Basic

Don’t use basic authentication.

Don’t submit the user’s username and password in the clear.

If you still want to keep using your Basic authentication: don’t.

Even the RFS that defined Basic Authentication says don’t.

The Basic authentication scheme is not a secure method of user authentication… — RFC 2617: HTTP Authentication: Basic and Digest Access Authentication

OAuth2

OAuth2 is where you probably want to be, but it has some gotchas, and its best practices have evolved over time. A few notes to be aware of are:

Now what?

If you’ve come this far, then you may have excitedly built something like this in your OpenAPI spec.

{
"type": "oauth2",
"flows": {
"authorizationCode": {
"authorizationUrl": "https://example.com/api/oauth/dialog",
"tokenUrl": "https://example.com/api/oauth/token",
"scopes": {
"write:pets": "modify pets in your account",
"read:pets": "read your pets"
}
}
}
}

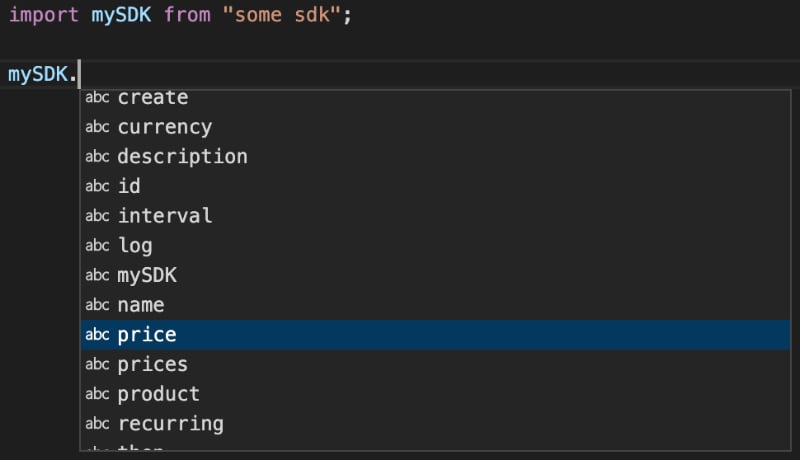
Your customers are happy to finally get some solid security, but then they ask you how to use it in their code. You spent all this time carefully implementing good security in the server, and now you have to implement the other end of it in an SDK?

That is a lot of hard, difficult work.

If only there was a better solution.
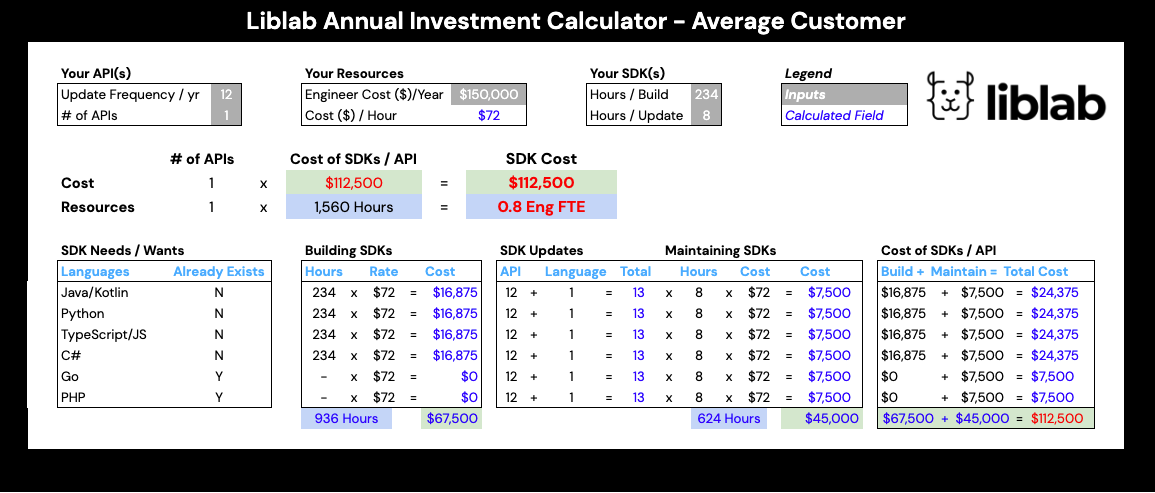
Use liblab!

Use liblab!

Give us your API, and we’ll generate SDKs with best practices built in. We won’t even generate an SDK that will put the user at risk, we’ll fail with friendly error messages and recommendations on how to fix it. We’ll make sure your security choices will never become someone else’s postmortem.

We even produce documentation for your API, so your users will know exactly how your security policies work.

liblab!