← Back to the liblab blog

At liblab we generate software development kits, or SDKs, for your APIs. But what do we mean by 'SDK generation', and how does it work? This post explains everything you need to know about SDK generation, and how it can help you make your APIs more accessible.

What is SDK Generation?

Put simply, SDK generation is the process of automatically generating SDKs from an API specification. You have an API exposed using something like REST, and you want to make it easier for developers to access that REST API.

You could just let them access the API directly, but this relies on your user not only being experts in their own domains, but also knowing how to make REST calls, and to a certain degree the best practices for using your API. By creating an SDK, you are building a layer of abstraction over that API, embedding those best practices into the internals of the SDK code, and providing a nicer interface to your API in the programming languages that the developer is using.

In my experience, every team of developers that accesses APIs will always build some kind of layer of abstraction themselves. This will contain things like wrapper objects for the requests and responses to avoid using JSON, and service classes that wrap the REST requests in methods. These layers of abstraction may also include things like authentication, refreshing access tokens, retries, and error handling. This takes a lot of work, and is often not shared between teams in an enterprise who are all using the same API.

By auto generating an SDK, you can provide this layer of abstraction for your API, and ensure that all developers are using the same best practices. This cuts down on the boilerplate code being written, and allows developers to focus on solving real problems instead of wrapping JSON and REST. You don't write swathes of code, you use a tool that will do all the hard work for you, taking in your API and spitting out an SDK.

A machine that coverts APIs to SDKs

This auto generation also handles updates - add a new endpoint to your API? Regenerate the SDK, and the new endpoint will be available to your users. This means that your users will always have access to the latest version of your API, and you don't need to worry about them using an old version of your SDK.

Read more on a comparison between APIs and SDKs.

How Does SDK Generation Work?​

SDK generation is computers writing code for you. A tool takes an API specification, and generates code that can be used to access that API. The SDK code is generated in the programming languages of your choice.

REST API Validation​

Every generated SDK starts from an API specification. These use standards like OpenAPI to define the API - including the endpoints that can be called, and the expected data that will be sent as the request body, or the response of the call.

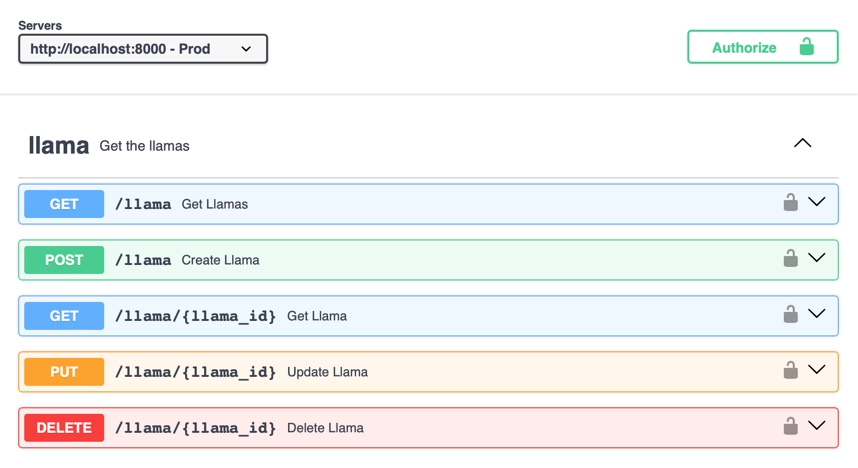
For example, your spec might have an endpoint called llama/{llama_id} that takes a llama Id in the URL, and returns a JSON object containing the details of that llama. The spec will define the URL, the HTTP method (GET), and the expected response body.

/llama/{llama_id}:
get:
tags:
- llama
summary: Get Llama
description: Get a llama by ID.
operationId: get_llama_by_id
parameters:
- name: llama_id
in: path
required: true
schema:
type: integer
description: The llama's ID
title: Llama Id
description: The llama's ID
responses:
'200':
description: Llamas
content:
application/json:
schema:
$ref: '#/components/schemas/Llama'
type: array
items:
$ref: '#/components/schemas/Llama'
title: Response 200 Get Llama By Id

The endpoints use schemas to define the objects that are sent or returned. In the example above, the response is defined as an array of Llama objects. The schema for a Llama object might look like this:

    Llama:
properties:
name:
type: string
maxLength: 100
title: Name
description: The name of the llama. This must be unique across all llamas.
age:
type: integer
title: Age
description: The age of the llama in years.
color:
allOf:
- $ref: '#/components/schemas/LlamaColor'
description: The color of the llama.
rating:
type: integer
title: Rating
description: The rating of the llama from 1 to 5.
id:
type: integer
title: Id
description: The ID of the llama.
type: object
required:
- name
- age
- color
- rating
- id
title: Llama
description: A llama, with details of its name, age, color, and rating from
1 to 5.

Before the SDK can be generated, the API needs to be validated. For example - the llama/{llama_id} endpoint returns a llama object defined using the #/components/schemas/Llama schema. If this doesn't exist, then the SDK cannot be successfully generated. The validation will also look for other things - for example, does the endpoint have operationId defined for each verb, which is used to generate the method name in the SDK. Are there descriptions for each endpoint, which can be used to generate the documentation for the SDK.

liblab can validate your API spec, and will give you a list of issues to resolve before you generate your SDK. The better your spec, the better your SDK will be.

SDK Generation

Once your API has been validated, the SDK can be generated. This is done by taking the validated API specification, and adding a sprinkle of liblab magic to generate the SDK code. This 'magic' is smart logic to build out model objects that match the requests and responses, as well as generating services that wrap the REST calls. The models handle missing fields in the responses, or patterns that are defined (such as ratings needing to be between 1 ans 5, or an email address field needing to be a valid email). The services implement required logic such as retrying failed requests, handling authentication, refreshing access tokens, and handling errors.

SDK generation also understands the programming language that you want to generate the SDK in. This means that the generated code will be idiomatic for that language. For example naming will be idiomatic to the language, so for the above llama example, the service will be called Llama in Python and C#, but the method to get a llama by Id will be get_llama_by_id in Python, and GetLlamaByIdAsync in C# - using snake case for Python and Pascal case for C#. The generated code will also use the idiomatic way of handling asynchronous calls - for example, in C# the generated code will use Task and async/await to handle asynchronous calls, naming them with the Async suffix.

A lot of the features generated in the SDK can be customized. For example, you can customize how retries are handled, including how many attempts and the time between retries. You can even hook into the API lifecycle and add custom logic to handle requests before they are sent, or responses before they are returned to the caller.

Documentation Generation​

As well as generating SDKs, liblab also generates documentation for the SDK from the validated API. This documentation not only shows how to call the API directly using tools like curl, but also code samples showing how to use the SDK. This way developers can literally copy and paste code examples from your documentation to get started quickly using your SDK.

This documentation is built using the descriptions and examples from the API spec, so the better the documentation in the spec, the better the documentation for the SDK. Your code samples will include these examples.

Packaging​

Its all very well to create an SDK, but you need to be able to store the code of your SDK somewhere, and distribute it to your users, and this is typically via a package manager like PyPi, NPM or NuGet. liblab generates all the relevant package manifest files, and can raise a pull request against your repository to add the generated SDK code. You can then review the PR, merge it, and publish the package to your package manager of choice, either a public package manager, or an internal one.

Best Practices For SDK Generation

Here are some best practices for SDK generation, to help you get the most out of your generated SDKs.

Understand Your Users’ Needs

The most important part of any software development process is:

Know thy user

Understand what your user needs. This might be their requirements for your SDK, or it will be your knowledge of how the SDK should work to give your users a seamless experience.

Generate for the users preferred programming languages

What programming languages are your users likely to use? For example, if you are developing for a large enterprise, chances are a C# and Java SDK might have a larger audience than a Go SDK. Smaller companies might be more likely to use Python or TypeScript.

Build for your users - and the big advantage of using SDK generation tools like liblab is growing the languages you support can be as simple as adding a new language to your config file, then packaging up the SDK for distribution to your users.

Simplify the Authentication Process

Authentication is hard, and everyone hates writing code to authenticate against an API. Make it easy for your users by handling authentication in the SDK. This might be as simple as providing a method to set the access token, or it might be more complex, such as handling the OAuth flow for your users by hooking into the API lifecycle.

SDKs can also handle refresh tokens, so if you want a persistent connection to your API, you can handle refreshing the access token in the SDK, and your users don't need to worry about it. This is very useful when writing server code that will run for months or even years on end, rather than desktop apps where the user will log in each day.

Have a good API spec

The old adage of 'garbage in, garbage out' applies here. If your API spec is not well defined, then the generated SDK will not be well defined.

Make sure you have tags and operation Ids defined, so the SDK services can be well named and grouped correctly - SDK generation uses the tag property to group endpoints into services, and the operationId to name the methods in the service (adjusting for different programming languages of course). For example, with this spec:

/llama:
get:
tags:
- llama
operationId: get_llamas
/llama_picture:
get:
tags:
- llama_picture
operationId: get_llama_pictures

This will give:

Service nameMethod name (Python)Method Name (C#)
llamaget_llamasGetLlamasAsync
llama_pictureget_llama_picturesGetLlamaPicturesAsync

Without these, the endpoints will be grouped into one service, and the names will be generated from the method and the URL, which might not give what you want.

For help on improving your OpenAPI spec, check out our Why Your OpenAPI Spec Sucks blog post.

Have Examples and descriptions

When coding, examples always help, giving developers something to start from when using a new SDK or library (the old joke about most code bring copied and pasted from Stack Overflow). The same applies to SDKs - if you have examples in your API spec, then these will be used to generate examples in the SDK documentation, and your users can copy and paste these examples to get started quickly.

Examples also help your users understand what data they should send to your API, and what they will get back. This is especially important for complex objects.

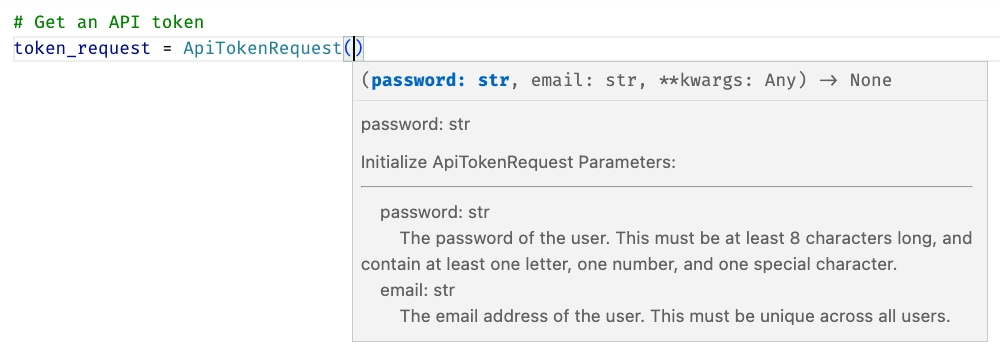
Descriptions are converted into code documentation, both in the SDK and in the docs that accompany it. These make it easier for your users to understand what the SDK is doing, and how to use it. In the example below, the documentation comes from the description in the API spec. The spec is:

APITokenRequest:
properties:
email:
type: string
title: Email
description: The email address of the user. This must be unique across all users.
password:
type: string
title: Password
description: The password of the user. This must be at least 8 characters long, and contain
at least one letter, one number, and one special character.

This gives the following documentation in your Python SDK:

A documentation popup for an APITokenRequest showing the descriptions of the email and password properties

Conclusion

SDKs make APIs more accessible for your users, and automatically generating SDKs makes it easier for you to provide SDKs for your APIs. liblab can help you generate SDKs for your APIs, and we can help you with the process of generating SDKs, and the best practices for doing so. Get in touch to find out more.

← Back to the liblab blog

Move fast! Break things! As developers on an agile team, we repeat these words constantly, always at least right up until the moment when something actually breaks. Then it turns out, despite all our oft touted slogans, what everyone really meant was: move fast without breaking things. Duh, why didn't we think of that sooner?

I want to talk about API-First Development because I believe an API-First approach will lead to a faster and more scalable approach to developing software applications—without breaking as many things along the way.

What does “API-First Development” mean?

API-First Development prioritizes the design and development of the API as the foundation for your entire architecture. This means taking extra care to treat your API as a product in its own right (even if it's only going to be consumed internally by your own developers). This might require a bit more planning and collaboration between stakeholders, but there are a lot of good reasons to invest a little bit of extra time up front.

Why API-First Development?

More traditionally, tech companies often started with a particular user experience in mind when setting out to develop a product. The API was then developed in a more or less reactive way in order to transfer all the necessary data required to power that experience. While this approach gets you out the door fast, it isn't very long before you probably need to go back inside and rethink things. Without an API-First approach you feel like you're moving really fast, but it's very possible that you're just running from the front door to your driveway and back again without ever even starting the car.

API-First Development flips this paradigm on its head by treating the API as the foundation for the entire software system. Let's face it, you are probably going to want to power more than one developer, maybe even several different teams, all possibly even working on multiple applications, and maybe there will even be an unknown number of third party developers. Under these fast paced and highly distributed conditions, your API cannot be an afterthought.

As a software system matures, its real value emerges from its integration into a more complex whole. Features and products are like big delicious juicy fruit hanging off a branch. Your API is the entire freakin' tree!

How do I get Started?

So you're feeling ready to dive into API-First Development? Spectacular! Trust me, the little bit of extra work up front will pay off big time down the road, and you'll start seeing the impact almost immediately.

The first step is to design and document your API. Don't worry, this isn't as complicated as it might sound. Just create an API Spec File. This file will serve as both blueprint and documentation for your API. There are several varieties in common use today (OpenAPI, Swagger to name 2). We don't need to stress out about which one to choose right now. The important thing is that all of these specifications provide machine-readable and standardized representations of your API. This standardization pays dividends later by helping you collaborate better, work more efficiently, beef up security, and seamlessly integrate with external systems.

Here's the best part: writing these specs is not as hard as you may first think. If you can handle writing the actual server code for your API, then you will pick up any of these specifications in no time at all. It's a natural extension of what you're already doing.

This may all seem a bit time-consuming at first, but trust me, that small investment up front will save you heaps of time down the road, especially once you start leveraging the power of code generators like liblab. These tools can do all sorts of cool stuff like generating SDKs and documentation for your API. Imagine making a change in one place, and boom! It's instantly updated across all the SDKs used by internal and third-party developers, as well as in your documentation.

Wouldn't that save you time? That's the transformative power of API-First development.

Conclusion

An API-First approach might not be the perfect fit for every use case. If you're working on a small app or a prototype with limited integration needs, going all out with extensive documentation and code generation might not be your cup of tea. Likewise, if you're dealing with a legacy application with its own well-established API, convincing management to dedicate the time and resources to document that API thoroughly might not be feasible. In most other cases however, adopting a more proactive API-First approach to development can unlock some serious benefits.

In today's interconnected digital landscape, it's high time that we start treating APIs as first-class citizens in our architectures. A top-notch API design sets the stage for innovation by enabling developers to leverage existing functionality in new and unexpected ways. On top of this, APIs fuel collaboration by boosting interoperability between systems. Given all these undeniable advantages, the only thing holding most developers back is a lack of knowledge. So buckle up then, and let's write a spec! Oh, and make sure it doesn't suck - learn some tips in this blog post from Sharon Pikovski.

← Back to the liblab blog

If you build APIs, you need to document them. After all, for your users to use your API, they need to know how to use it. A common phrase I like to use as someone who writes a lot of docs is "if it's not documented, it does not exist" - your users can only use a feature if they can discover not only that it exists, but how to use it.

So what is API documentation? How should you write it? What should you include? What are the best practices? In this post I'll answer all of these questions and more and give you some best practices for creating API documentation.

What is API Documentation?

API documentation is the collection of materials your users can use to learn how to effectively build apps using your API. It should contain a range of things:

  • API Reference documentation for the endpoints, parameters, request and response objects, and expected status codes
  • Examples of using the API
  • Examples for the request and response objects to help users know what to pass and what to expect back
  • Error messages and status codes that can be returned, and what they mean
  • Basic usage guides such as how to get started, authentication, and common scenarios
  • Tutorials for more complex scenarios

Why is API Documentation Important?

API documentation is how your users know how to use your API. Without it, they will at best struggle to use your API, and at worst have no idea how to do anything. APIs are lacking in discoverability - without any kind of documentation you literally cannot know what endpoints to call. Even with a list of endpoints, you still need to know what to pass to them, and what to expect back.

For even better discoverability, you can use liblab to generate SDKs from your API specs. SDKs are a much better developer experience than using APIs directly, allowing you to discover the functionality and request and response objects through tools such as IDE autocompletion.

Documentation goes beyond discovering what your API does, it also explains details on how to use it effectively. This can include how to correctly authenticate, how to handle errors, and best practices for using the API.

For example, if you call an endpoint to retrieve some data and you get a 404 status code returned. Does that mean the data does not exist, or that you don't have permission to access it? Good documentation will explain this, and give you the information you need to handle it correctly.

How and where to write API Documentation?

The best place to write API documentation is in your API!

API Specs

When you publish your API, you should always also publish an API spec. This is generated documentation that lists your API endpoints and the request and response objects, and uses standards like Swagger or OpenAPI. The big advantage of this is a lot of the time this can be autogenerated! For example if you are using FastAPI (a Python framework for building APIs) to generate your API, you can have the framework create an OpenAPI spec with no extra code to write.

API specs as a default provide a list of endpoints, what is expected for endpoint parameters, and the request and response objects. These are JSON or YAML documents, so out the box not that easy to read - but there are plenty of tools that can convert these into nice hosted documentation (FastAPI for example has this built in), and again can be built into your API tools or hosting process.

For example, we have a llama store as a reference API for building SDKs against, and it has a spec that is 1115 lines of JSON (you can read it on our GitHub if you want some light bedtime reading). This is small compared to some specs we see at liblab, with over 40,000 lines not uncommon! Reading this much JSON is hard, so there are plenty of tools that render this direct from the API. For example, FastAPI as mentioned before generates OpenAPI specs, as well as hosting generated documentation:

The hosted docs for the llama store

You can see these docs yourself, just clone the llama store, run it locally and access localhost:8000/docs.

Adding documentation to API Specs

As well as these specs listing your endpoints, they can also include a wide range of documentation. This includes:

  • Top level API documentation where you can describe in detail the API, such as how to use it, how to authenticate, and best practices
  • Endpoints descriptions
  • Descriptions and examples for endpoint parameters
  • Description and examples for request and response objects
  • Descriptions for different status codes, including why they might be returned, and what data might some with them

For example, the llama store has a top level description in the OpenAPI spec:

{
"openapi": "3.1.0",
"info": {
"title": "Llama Store API",
"description": "The llama store API! Get details on all your favorite llamas.\n\n## To use this API\n\n- You will need to register a user, once done you can request an API token.\n- You can then use your API token to get details about the llamas.\n\n## User registration\n\nTo register a user, send a POST request to `/user` with the following body:\n \n```json\n{\n \"email\": \"<your email>\",\n \"password\": \"<your password>\"\n}\n```\nThis API has a maximum of 1000 current users. Once this is exceeded, older users will be deleted. If your user is deleted, you will need to register again.\n## Get an API token\n\nTo get an API token, send a POST request to `/token` with the following body:\n \n```json\n{\n \"email\": \"<your email>\",\n \"password\": \"<your password>\"\n}\n```\n\nThis will return a token that you can use to authenticate with the API:\n\n```json\n{\n \"access_token\": \"<your new token>\",\n \"token_type\": \"bearer\"\n}\n```\n\n## Use the API token\n\nTo use the API token, add it to the `Authorization` header of your request:\n\n```\nAuthorization: Bearer <your token>\n```\n\n\n",
}
}

This is actually set in code - something that FastAPI supports is adding these kinds of OpenAPI values to your API code:

app = FastAPI(
servers=[{"url": "http://localhost:8000", "description": "Prod"}],
contact={"name": "liblab", "url": "https://liblab.com"},
description="The llama store API! Get details on all your favorite llamas.\n\n## To use this API\n\n- You will need to register a user, once done you can request an API token.\n- You can then use your API token to get details about the llamas.\n\n## User registration\n\nTo register a user, send a POST request to `/user` with the following body:\n \n```json\n{\n \"email\": \"<your email>\",\n \"password\": \"<your password>\"\n}\n```\nThis API has a maximum of 1000 current users. Once this is exceeded, older users will be deleted. If your user is deleted, you will need to register again.\n## Get an API token\n\nTo get an API token, send a POST request to `/token` with the following body:\n \n```json\n{\n \"email\": \"<your email>\",\n \"password\": \"<your password>\"\n}\n```\n\nThis will return a token that you can use to authenticate with the API:\n\n```json\n{\n \"access_token\": \"<your new token>\",\n \"token_type\": \"bearer\"\n}\n```\n\n## Use the API token\n\nTo use the API token, add it to the `Authorization` header of your request:\n\n```\nAuthorization: Bearer <your token>\n```\n\n\n",
openapi_tags=tags_metadata,
version="0.0.1",
redirect_slashes=True,
title="Llama Store API",
)

This then gives these docs:

The rendered top level description

You may notice that the description has markdown! This is nicely rendered in the docs. This is a great way to add rich documentation to your API specs, and is a great way to add tutorials and best practices. This rich documentation can also provide code examples, error messages and more.

This generated documentation should not just be made available via your API, but also hosted on a public documentation site.

Additional documentation

As well as documenting your API in the API spec, you can also add additional documentation on your public documentation site. Your API docs become the reference documentation, but you should add tutorials, how to guides, and best practice documentation as well.

Your API spec documentation can define what each endpoint does and how to call it, but it may not define the correct flow that a user might take for a typical task. For example, if your API has long running tasks, you may need to document how a user can trigger a task, check the status, then retrieve the result, all using different endpoints.

Who Should Write API Documentation?

As someone who started out in engineering before I moved to developer relations, I know how hard it is to write documentation. It's not something that comes naturally to most engineers, and it's not something that most engineers enjoy doing. But it is something that is important, and something that needs to be done.

In a perfect world, your documentation would be written by a dedicated technical writer, working in collaboration with the engineers to understand how the API works, and with the product teams to understand the end-to-end user experience. They should then feed this documentation back to the engineers to add to the API spec.

We all don't live in a perfect world though, so the next best thing is to have the engineers and product teams write the documentation. They know the API best, and can write the most accurate documentation.

Ideally you should use a framework for your API that makes writing these docs easy - for example FastAPI as mentioned before makes it easy to add documentation to your API code, and then generates the OpenAPI spec for you. This way you can even 'enforce' this by having a check for documentation in your pull request review process, or in a linting check in your CI/CD pipeline.

As an API provider - make sure you have documentation firmly in your process!

API Documentation Best Practices

Here are some API documentation best practices for writing api docs:

1 - Write in clear language

A good rule for everyone writing any documentation, including creating API documentation, is to be as clear as possible. Avoid jargon, unless it is necessary technical terminology for your product, and find ways to define this, or link to other documentation. There are some things you can assume your users know, but don't assume they know everything. It's helpful to define a minimally qualified reader, which defines the minimum knowledge or skills for each piece of documentation, and write for them.

For example, you can assume that your users know how to call an API (though a link to a guide on this is always helpful), but you can't assume they know how to authenticate, or what a JSON object is. As you document more advanced functionality, you can assume some knowledge of your API, such as assuming they know how to create a new user when documenting how to interact with that user.

2 - Show, don't tell

For any documentation, showing is better than telling. Examples always help - it's amazing how much easier it is to understand something when you can see it in action.

This is true for API documentation as well. If you want to teach someone how to get data from your API, show them the request, and what response they will get. When using your API, users could be using one of many programming languages, so provide code examples for the main ones. For example, if your API is targeted towards an enterprise, have code examples in C# and Java.

3 - Add references docs, tutorials, and guides

Documentation comes in a variety of modes, and it is good to implement them all. These are:

  • Tutorials - learning oriented
  • How to guides - task oriented
  • Explanation - understanding oriented
  • Reference docs - information oriented

I won't go into these in more depth here, but read up on Diátaxis for more information.

Reference docs and explanation should be in your API specs, and hosted on your public documentation site. Tutorials and how to guides can be on your public documentation site.

Your tutorials should also always have a quickstart. Humans like instant gratification, so being able to very quickly get started with an API is a great motivator to learn more and use it more. If a user struggles to even do the basics, they are likely to drop your API and move to a competitor. That initial documentation is crucial to keeping users engaged.

4 - Add code samples

Code samples always help! You users are engineers after all, and will be accessing your API using code. Code samples allow them to quickly craft API calls, and see what they will get back. They also allow you to show best practices, such as how to handle errors, and how to handle pagination.

Obviously the best code samples are using an SDK instead of an API - something liblab can help with!

5 - Keep it up to date

This is sometimes the hardest. When an API has no documentation there's often a big effort around writing api documentation once, usually before a big release, but no continuous time given to keeping the api docs up to date - changing them as features change or adding new features.

This is why it's important to have documentation as a part of your engineering and release process. Don't let any feature out the gate without docs, add documentation to your PR processes, or add checking for docs to your CI/CD pipelines. If you have a dedicated technical writer, they can help with this, but if not, make sure the engineers and product teams are writing the docs as they write the code.

Feature flags can be particularly helpful here, allowing features to be released, but not turned on until the docs are ready (and maybe turned on for the doc writers so they can verify what they are writing).

6 - Make it accessible

Accessibility is important for documentation as well as your API. Make sure your documentation is accessible to everyone, including those with visual impairments. This means when you render it on a docs site using good color contrast, and making sure any images have alt text. It also means making sure your documentation is accessible to screen readers, and that any code samples are accessible.

You also may have users who don't speak the default language of your company, so consider translating your documentation into other languages. This is a big effort, but can be done in stages, starting with machine translations for the most popular languages for your users, and moving on to human efforts.

7 - Make it someones problem

The best way to ensure you have good docs, is to have someone responsible. This is the person who can hold up a release or turning on a feature flag if docs are not ready. Without someone taking responsibility, it's easy for docs to be forgotten about, and for them to become out of date. "Oh, we'll do it later, we need to release for customer X" is the start of the slippery slope to no useful docs.

Make your SDKs better with good API documentation

The other big upside of good API documentation is it can automatically become the documentation for your SDK. With liblab, every time you generate an SDK, the documentation and examples are lifted from your API spec and included in the SDK. For example, with the following component in your API spec:

APITokenRequest:
properties:
email:
type: string
title: Email
description: The email address of the user. This must be unique across all users.
password:
type: string
title: Password
description: The password of the user. This must be at least 8 characters long, and contain
at least one letter, one number, and one special character.

You would get the following documentation in your Python SDK:

A documentation popup for an APITokenRequest showing the descriptions of the email and password properties

Conclusion

Your users deserve good documentation for your API, and for any SDKs generated from them. With liblab, you can generate high quality SDKs from your API specs, and include the documentation and examples from your API spec in the SDKs. This means you can focus on writing good API specs and writing good API documentation, and let liblab do the hard work of generating the SDKs and documentation for you.

← Back to the liblab blog

This is a guest post by Emmanuel Sibanda, a Full Stack Engineer with expertise in React/NextJS, Django, Flask who has been using liblab for one of his hobby projects.

Boxing data is very hard to come by, there is no single source of truth. One could argue that BoxRec is the 'single source of truth'. However, you will only find stats on a boxer's record and a breakdown of the fights they have had on BoxRec. If you want more nuanced data to better understand each boxer you would need to go to CompuBox to get data on punch stats recorder per fights. This doesn't include all fights, as they presumably only include fights that are high profile enough for CompuBox to show up and manually record the number and type of punches thrown.

Some time back I built a project automating retrieving data from BoxRec and enriching this with data from CompuBox. With this combination of data, I can analyze;

  • a boxer's record (eg. what is the calibre of the opponents they have faced, based on their opposition's track record)
  • a boxer's defense (eg. how many punches do their opponents attempt to throw at them in each recorded fight and on average, how many of these punches actually land). I could theoretically breakdown how well the boxer defends jabs, power shots
  • a boxer's accuracy using similar logic to above
  • how age has affected both a boxer's accuracy and defense based on the above two points
  • a comparison of whether being more defensive or accurate has a correlation to winning a fight (eg. when a fight goes the full length, do judges often have a bias towards; accuracy, aggression or defense)

These are all useful questions, if you want to leverage machine learning to predict the outcome of a fight, build a realistic boxing game or whatever reason, these are all questions that could help you construct additional parameters to use in your prediction model.

Task: Create an easily accessible API to access the data I have collected

Caveat: I retrieved this data around November 2019 - a lot has happened since then, I intend to fetch new data on the 19th of November 2023.

When I initially built this project out, initially a simple frontend enabling people to predict the outcome of a boxing match based on a machine learning model I built using this data, I got quite a few emails from people asking me how I got the data to build this model out.

To make this data easily accessible, I developed a FastAPI app, with an exposed endpoint for data retrieval. The implementation adheres to OpenAPI standards. I integrated Swagger UI to enable accessibility directly from the API documentation. You send the name of a boxer and receive stats pertaining their record.

Creating an SDK to enable seamless integration using liblab

I intend to continue iteratively adding more data and ensuring it is up to date. In order to make this more easily accessible I decided to create a Software Development Kit. In simple terms, think of this as a wrapper around the API, that comes with pre-defined methods that you can use, reducing how much code you would need to write to interact with the API.

In creating these SDKs, I ran into a tool; liblab, an SDK as a service platform that enables you to instantly generate SDK in multiple languages. The documentation was very detailed and easy to understand. The process of creating the SDK was even simpler. I especially like that when I ran the command to build my SDKs I got warnings with links to OpenAPI documentation to ensure that my API correctly conformed to OpenAPI standards, as this could result in creating a subpar SDK.

Here's a link to version 1 of the BoxingData API.

Feel free to reach out regarding any questions you have, data you want me to include and if you want me to send you the SDKs (Python and TypeScript for now). You can find me on LinkedIn and Twitter.

← Back to the liblab blog

SDK and API are 2 terms banded around a lot when developers think about accessing services or other functionality. But what are they, and what are the differences between them? This post will teach you everything you need to know and how SDKs can benefit your software development process!

Key Differences: SDK vs API

API (Application Programming Interface) is a set of rules that allow different software applications or services to communicate with each other. It defines how they can exchange data and perform functions. APIs are often used for integrating third-party services or accessing data from a platform, and they are language-agnostic.

SDK (Software Development Kit) is a package of tools, code libraries, and resources designed to simplify software development for a specific platform, framework, or device. SDKs are platform-specific and provide pre-built functions to help developers build applications tailored to that platform. They are typically language-specific and make it easier to access and use the underlying APIs of the platform they are designed for.

As we compare SDK vs API, here are some key differences:

APISDK
Pass data as JSONPass data as strongly typed objects
Call endpoints defined using stringsCall methods or function
No compiler or linter checkingCompiler and linter checking
No automatic retriesAutomatic retries can be defined in the SDK
You have to read the docs to discover services or learn what data to pass or receiveIntellisense and documentation
Can be called from any programming language, as well as tools like Postman or low/no-code toolsCan only be called from compatible languages

What is an Application Programming Interface (API)?

An API, or application programming interface is an interface to a system that application programmers can write code against. This reads like I'm just juggling the words around, so let's break down this statement.

There are many systems and services out there that you might want to integrate into your application. For example, you might want to use Stripe as a payment provider. As you program your application, you need to talk to these services, and these services define an interface you can use to talk to them - this interface lists all the things you can do with the service, and how to do them, such as what data you need to send or what you will get back from each call.

Application Programming Interfaces in the modern world

In the modern software development world we think of APIs as a way of making calls to a service over networks or the internet using standard protocols. Many services have a REST API - a set of web addresses, or URLs, you can call to do things. For example, a payment provider API will have endpoints you can call to create a payment or authorize a credit card. These endpoints will be called using HTTP - the same technology you use when browsing the internet, and can take or return data either in the URL, or attached to the call in what is called the body. These are called using verbs - well defined named actions, such as GET to get data, or POST to create data.

An API with 2 methods exposed, a GET and a POST on the /user endpoint An API with 2 methods exposed, a GET and a POST on the /user endpoint

Calling APIs

Calling an API endpoint is referred to as making a request. The data that is returned is referred to as a response.

APIs can be called from any programming language, or from tools like Postman.

There are many protocols APIs can use, including REST, gRPC, GraphQL and SOAP. REST is the most common, and the one I'll be referencing in this article.

What is a Software Development Kit (SDK)?

A software development kit is a code library that implements some kind of functionality that you might want to use in your application.

What can SDKs be used for?

SDKs can implement a huge range of functionality via different software components - they can include visual components for desktop or mobile apps, they can interact with sensors for embedded apps, or provide frameworks to speed up application development.

SDKs for your APIs

Another use case for SDKs is to provide a wrapper around an API to make it easier to call from your application. These SDKs make APIs easier to use by converting the calls you would make into methods, and wrap the data you send and receive in objects.

An SDK with 2 methods exposed, a getUser method that wraps the GET on /user and a createUser that wraps the POST on /user An SDK with 2 methods exposed, a getUser method that wraps the GET on /user and a createUser that wraps the POST on /user

These SDKs can also manage things like authentication or retries for you. For example, if the call fails because the service is busy, the SDK can automatically retry after a defined delay.

For the rest of this article, when I refer to SDKs I'll be talking about SDKs that wrap APIs.

How Do APIs Work?

APIs work by exposing a set of endpoints that you can call to do things.

API Endpoints

These endpoints are called using verbs that roughly align to CRUD (create, read, update, delete) operations.

For example, you might have a user endpoint that handles the following verbs:

VerbDescription
GETRead a user
POSTCreate a user
PUTUpdate a user
DELETEDelete a user

API Data

Data is typically sent and returned as JSON - JavaScript object notation. For example, a user might be returned as:

{
"id": 42,
"firstname": "Jim",
"lastname": "Bennett",
"email": "jimbobbеnnе[email protected]"
}

How Do SDKs Work?

Software Development Kits work by wrapping the API calls in code that is easier for developers to use.

Creating a user with an API

For example, if I wanted to create a user using an API, then my code would need to do the following:

  1. Create an HTTP client - this would be code from a library that can make HTTP calls.
  2. Create a JSON object to represent my user.
  3. If my API requires authentication, I would need to get an access token and add it to the request.
  4. Send the JSON object to the API endpoint using the HTTP client.
  5. Get a response and see if it was successful or not.
  6. If it was successful, parse the response body from JSON to get the user Id.

This is a number of steps, and each one is error prone as there is no compiler or linter to help you. For example, if you sent the first name in a field in the JSON object called "first-name" and the API expected it to be "firstname" then the API call would fail at run time. If you forgot to add the access token, the API call would fail at run time. If you forgot to check the response, your code would continue to run and would fail at some point later on.

Creating a user with an SDK

An SDK on the other hand would implement most of this for you. It would have a class or other strongly typed definition for the user object, and would handle things like authentication and error checking for you. To use an SDK you would:

  1. Create an instance of the SDK class.
  2. Set the authentication token once on the SDK so it can be used for all subsequent calls.
  3. Create an instance of the user object, and set the properties.
  4. Call the SDK method to create the user, passing in the user object.
  5. If this fails, an exception would be thrown, otherwise the user Id would be returned.

Benefits of Application Programming Interfaces

APIs are the perfect way to expose a service to your internal infrastructure or the world via the internet. For SaaS (Software-as-a-Service) companies like Auth0 and Stripe, their APIs provide the services that their customers use to integrate with their applications. Internally organizations can build microservices or other internal services that different teams can use to build applications. For example, a company might have a user service that manages users, and a product service that manages products. These services would expose APIs that other teams can use to build applications.

By using a standard protocol such as REST you are providing the most widely used interface - development tools like programming language and many low/no-code technologies can call REST APIs. This means that your service can be used by any application, regardless of the technology it is written in.

Pretty much. every service should have an API if it needs to be called from an application.

Benefits of Software Development Kits

SDKs on the other hand are software components that provide wrappers over APIs. They make it easier to call APIs without making mistakes by providing things like type safety and error handling. If you use the wrong name for a field on an object, your compiler or linter will tell you (probably as soon as you type it with a red squiggly in your IDE). If you forget to add an access token, the SDK will throw an exception, but once set it can be used for all calls, and not need to be set every time. If the API call fails, the SDK can retry for you.

The benefit of an SDK is this hand-holding - it's a wrapper around the API that makes your life easier. An SDK takes nothing away from your API, developers can still call it directly if they are so inclined, but the SDK makes it substantially easier to use.

How and When to Choose Between SDKs or APIs?

As a provider of a service, there is no choice as such. You have to provide an API so software developers can call you service. Should you provide an SDK as well as part of your development process? Well, yes - it improves the experience for your users, and makes it easier for them to use your service. If you don't provide an SDK, then your users will have to write their own, and that's a lot of work for them. Keep your customers and users happy, right?

Conclusion

In this post we've looked at the differences between SDKs and APIs, and when you might use one over the other. We've seen that APIs are the interface to a service, and SDKs are wrappers around APIs that make them easier to use. We've also seen that APIs are the best way to expose a service to the world, and SDKs are the best way to make it easier to use an API.

Can I automate SDK generation?

The obvious question now is how do I create an SDK for my API. You could write one yourself, but why do that when liblab can automate SDK generation for you as part of your software development process? Check out liblab.com for more information and to sign up!

← Back to the liblab blog

In the ever-evolving software development landscape, selecting the right tools can make or break your project's success. With a plethora of options available, it can be overwhelming to choose the best one. In this blog post, we will discuss why liblab stands out as a superior choice over its competitors in various aspects, including user-friendliness, customization, support, security, reliability, cost, number of supported languages, and documentation.

User-Friendliness: Human Readability and IDE Compatibility

liblab prides itself on its user-friendly nature. The code generated by liblab looks like it was written by a human rather than a machine, making it easier to read and understand. Additionally, liblab's code is easily picked up by Integrated Development Environments (IDEs), providing users with helpful type hinting for a seamless development experience.

Customization

liblab offers unique customizations tailored to your business’ needs, with over 147 hours of investment put into refining these features. Regardless of your needs, liblab can be customized to provide a solution that meets your unique requirements and ensures the best possible development experience.

Support: A Comprehensive Solution

Unlike many competitors, liblab is more than just a product; it is a complete solution that includes both product and service. With a dedicated Technical Account Manager (TAM), liblab ensures that you meet Rapyd's developer experience goals via SDKs and documentation.

Security: SOC2 Compliance and Best Practices

Security is paramount in today's digital world. liblab is SOC2 compliant and continuously incorporates best practices to ensure that your data and developers are protected at all times.

Reliability: On Call Support and Code Reliability

liblab offers on-call support with Service Level Agreements (SLAs) that guarantee a response to your requests within 12 hours. Furthermore, liblab generates tests for all its SDKs, ensuring code reliability and reducing the likelihood of unexpected issues.

Cost: Upfront Savings and Minimized Backend Costs

By choosing liblab, you can significantly reduce costs associated with building and maintaining your development infrastructure. liblab's upfront cost eliminates the need to hire a team and develop subject matter expertise over time, allowing your engineers to focus on higher ROI, mission-critical work.

Number of Supported Languages: Idiomatic and Quality-driven

By the end of the year, liblab plans to support six languages, with a focus on idiomatic patterns. This ensures that each language is of high quality and useful for developers. While competitors may offer more partially-maintained languages, liblab emphasizes quality first, with quantity following soon after.

Documentation: SDK Embedded Docs

liblab auto-generates powerful documentation that includes code examples from your SDKs, making it easier for developers to understand and use the software.

In conclusion, liblab outshines its competition in multiple aspects, making it the ideal choice for your development needs. With its user-friendly code, extensive customization, comprehensive support, strong security, impressive reliability, cost-effective pricing, commitment to quality-driven language support, and robust documentation, liblab is the clear winner in the race for the best development solution.

← Back to the liblab blog

As frontend developers, we often face the challenge of transforming a complex API into an intuitive experience for the end user. We need to account for all possible inputs for every API call, while only showing the user those inputs that are relevant to them. In this article, we will show how to add query params to a web applications, so that we can greatly enhance both the experience of the users and our own development experience.

Introducing the NASA APOD API

Let's take for example the NASA APOD (Astronomy Picture of the Day) API. The docs define a base url and the parameters that the API can accept, which include date, start_date, end_date and count:

ParameterType                    DefaultDescription
dateYYYY-MM-DDtodayThe date of the APOD image to retrieve
start_dateYYYY-MM-DDnoneThe start of a date range, when requesting date for a range of dates. Cannot be used with date.
end_dateYYYY-MM-DDtodayThe end of the date range, when used with start_date.
countintnoneIf this is specified then count randomly chosen images will be returned. Cannot be used with date or start_date and end_date.
thumbsboolFalseReturn the URL of video thumbnail. If an APOD is not a video, this parameter is ignored.
api_keystringDEMO_KEYapi.nasa.gov key for expanded usage

However, not all params can be given at the same time. The API expects either date or start date and end date or count*.* Since a combination of two or more is not allowed, we cannot pass, for example, count and date.

Translating the API into a User Interface

We can make this intuitive to the end user by displaying a dropdown with options to search by, and display only the relevant input fields based on the user's choice:

  • If the user selects to search by “count”, the would be presented with a single numeric input.
  • If the user selects “data”, they would be presented with a single date picker.
  • If the user selects “range”, they would be presented with two date pickers, one to select the start date and one to select the end date.

Searching APOD by a date range

So, depending on their selection, the user would be presented with either a single date picker, two date pickers (for start and end dates) or a number input.

Storing the user input in query params

To easily keep track of the user's selection, we can store their “search by” choice, along with the values of their inputs, as query params in the page's url. For example, when selecting to search by range and filling in a start date and an end date, the query params would include:searchBy, start and end.

Searching apod with query parameters

In total, the query string would contain ?searchBy=range&start=2022-06-21&end=2023-06-21. And given this query, we have all we need to determine the values of each of the input fields. So if the user were to refresh the page, the input fields would be populated with the correct values.

A simple data flow

This allows us to create a simple flow of data, where input by the user updates the query params, and the query params are used as input for the application itself. This can be illustrated in the following diagram:

The query parameter flow

On page load, we would validate the query params, and use the validated values to both populate input fields and make the correct API calls. For example, if the query string is:

?searchBy=range&start=2022-06-21&end=2023-06-21, these are the query params:

  • searchBy with the value “range”
  • start with the value 2022-06-21
  • end with the value, 2023-06-21

Given these query params, we can populate the input fields:

  • The “search by” dropdown with the value "range",
  • The “start date” picker with the date of 06/21/2022,
  • The “end date” picker with the date of 06/21/2023

Making the API Call

We can also use the query params to make an API call to APOD, providing it with the start date and end date. The following would be the complete URL of the API call:

  • https://api.nasa.gov/planetary/apod?api_key=DEMO_KEY&start_date=2022-06-21&end_date=2023-06-21

Finally, the response of the API call will be used to display the search results. When the user updates any of the input fields, whether it's any of the date selections or the “search by” option, the query params in the url would be updated, starting over the cycle.

Conclusion

Of course, there are many additional considerations. For example, we may want to perform validations when receiving the user's input. We would also want to ensure that the API calls we make are correct: passing the right params and knowing the shape of the response are just a few of the common problems in that space. Having an SDK can make this process easier: here at liblab we make the it easy for developers to create an SDK from any API, allowing the communication with their backend to be as simple as making a function call.

← Back to the liblab blog

So you have started a new project. The field is green, the air is fresh, there are no weeds, how exciting!

But where do you start? What is the first thing you do?

Surely you should write some code?

Well, no.

You must have had shiny new projects before, but they mostly turned out sour at some point, became hard to understand and to collaborate in, and very slow to add new changes.

If you are wondering why, we will explore the common causes, and more importantly, solutions that we can adopt to prevent such things from happening.

These causes can range from more than one naming convention, multiple contradicting rules, improperly formatted code, no tests, which results in an overall very frightening environment to make changes in.

Which rules should you follow?

How should you format your code?

How can you be sure that your changes have not broken anything?

It would be good if we knew all the answers to these questions.

It would be even better if you didn't have to concern yourself with these issues and could solely focus on coding.

It would be best if anyone on our project didn’t have to worry about them and could just focus on coding.

The key resource in software development is time, and the faster we are able to make changes and move forward, the greater advantage we will have in the market.

There is a saying, preparation is half the battle and in this blog post we will explore various techniques we can apply to our project to help us maintain velocity and quality throughout the lifetime of the project.

Chapter 1: Setup

So you open the project in your favorite IDE and it is basically empty.

You don’t know where to start or what to do first?

Ideally, before writing any code, we should invest time into setup. To elaborate, by investing we mean paying a certain price now in order to reap greater benefits in the long run. The main intention behind this time investment is to make it easy and fast for us to make changes in the existing codebase no matter how large it grows. This also means that new members that join the project can understand the system and its convention with as little effort as possible and be confident in the changes they are making.

But what should we invest in?

If we can sum up what makes a software project good it’s very simple:

The code should be easy to understand, test and change.

That may sound too simple, but ultimately, it’s the truth.

As programmers, we want to write super powerful and reusable code, but in practice that results in files and functions that span hundreds, if not thousands of lines, have tens of parameters and behave in a myriad of ways, depending on how we call them. This makes them very hard to understand and test, which means that it takes a lot of time to change them. And if there is one constant in software: is that it changes. Setting us up correctly will save a lot of time in the long run and make it less frightening to make changes.

Code repository

Even if you are going to be working alone on a project, it is a very good idea to use a VCS (version control system).

So naturally the first thing, even before opening your IDE, should be to setup the code repository of your choice. This means that you should pick your main branch and protect it. No one, including yourself, should be allowed to directly push to it, instead all changes should be made through pull requests.

Yes, if you are working alone, you should be reviewing your own PRs. This additional filter will catch many ill-committed lines before they reach production code.

Linting

A red sign with please stay on the path on it in white writing.

Linters are tools that analyze source code for potential logical errors, bugs, and generally bad practices. They can help us enforce rules which helps improve code quality, readability, maintainability, and consistency across a codebase.

There are many linters to choose from:

  1. ESLint
  2. JSLint
  3. JSHint

How they are setup varies widely on the specific providers, but most of them support a common set of rules.

The most popular and recommended provider is ESLint, below are some important rules that every project should have:

  • complexity The number one time consumer in understanding and changing code is complexity, luckily we can enforce simplicity in code using this rule. This rule analyses and limits the number of logical statements in one function:

    function a(x) {
    if (true) {
    return x; // 1st path
    } else if (false) {
    return x + 1; // 2nd path
    } else {
    return 4; // 3rd path
    }
    } // complexity = 3
  • no explicit any The pseudo type any means that our variable or object can have literally any field or value. This is the equivalent of just removing typing. There might be times where we think about reaching for this unholy type, but more often than not we can avoid it by using other typing mechanisms such as generics. The following example shows how to resist the temptation and use careful thinking to solve a type “problem”

    function doSomethingWithFoo(foo: any): any {
    ... // do something with foo
    return foo;
    }
    function doSomethingWithFoo<T>(foo: T): T {
    ... // do something with foo
    return foo;
    }

    However, if you don’t have access to a certain type, you can use the built-in helpers such as:

    ReturnType<someLibrary['someFunction']> and Parameters<someLibrary['someFunction']>

    Alternatively you can use unknown instead of any which is safer because it will require you to cast the operand into a type before accessing any of it’s fields.

  • explicit return types Enforces explicit return types in functions. Although it is possible for the language interpreter to infer the return types of functions, it is recommended to be explicit about them so that know how some function is intended to be used, instead of guessing.

  • no-undef Disallow usage of undeclared variables.

  • no-unused-vars This is a rule that does not allow for us to have unused variables, functions or function parameters.

    We can do this by adding this rule:

    "@typescript-eslint/no-unused-vars": ["error"]

    Unused code is an unnecessary burden, since we need to maintain it and fear deleting it once it arrives to our main branches, so it’s best to prevent this from even being merged. However, there will be cases such as method overloading or when implementing an interface, where we will need to match the signature of a method, including the parameters, but we might not be using all of them.

    Imagine we have an interface:

    interface CanSchedule {
    schedule(startTime: Date, endTime: Date);
    }

    Now we want to implement this interface, however, we won’t be using both of the arguments:

    class Scheduler implements CanSchedule {
    // throws an error since endTime is unused!
    schedule(startTime: Date, endTime: Date) {
    console.log(`scheduling something for ${startTime.toDateString()}`);
    }
    }

    In that case we can add an exception to this rule, not to apply to to members with a prefix such as _. This can be done in eslint with the following rules:

    "@typescript-eslint/no-unused-vars": [
    "error",
    {
    "argsIgnorePattern": "^_",
    "varsIgnorePattern": "^_",
    "caughtErrorsIgnorePattern": "^_"
    }
    ],

    Now we can write something like:

    class Scheduler implements CanSchedule {
    // No longer throws an error
    schedule(startTime: Date, _endTime: Date) {
    console.log(`scheduling something for ${startTime.toDateString()}`);
    }
    }
  • typedef Enforces us to define types for most of the fields and variables.

    No cutting corners!

💡 However, if you find it too time consuming to set up lint rules manually, you can probably find an already configured linter with the rules that best suite your taste.

Here is a useful list of popular linter configurations for typescript:

github.com/dustinspecker/awesome-eslint

Prettier

A red lipstick

There is a saying in my native language: A hundred people, a hundred preferences.

Now imagine a project where every developer introduced their preference in coding style. Yeah, it’s terrifying for me too.

Now imagine that you can avoid all of that. Good thing is that we don’t have to imagine, we can just use a prettier. Prettier enforces a consistent code-style, which is more important than one developer’s preference.

It is very simple to setup and use:

# install it
npm install --save-dev --save-exact prettier
# add an empty configuration file
echo {}> .prettierrc.json
# format your code
npx prettier --write .

Configure it however you prefer, no one can tell you which style is good or bad, however only two important javascript caveats comes to mind:

  • Please use semicolons.

    Why?

    Javascript compilers will automatically insert semicolons in the compilation stage ASI, and if there are none, they will try to guess where they should be inserted which may result in undesired behavior:

    const a = NaN
    const b = 'a'
    const c = 'Batman'
    (a + b).repeat(3) + ' ' + c

    Now you might think this code will result in 'NaNaNaNaNaNa Batman' but it will actually fail with Uncaught TypeError: "Batman" is not a function (unless there is a function named Batman in the upper scope).

    Why is that?

    Javascript compilers will interpret this as

    const a = NaN;
    const b = 'a';
    const c = 'Batman'(a + b).repeat(3) + ' ' + c;

    due to the lack of explicitness in regards to semicolons.

    Luckily, the semi rule is enabled by default, so please don’t change it;

  • Use trailing commas,

    This is often overlooked, and might seem like it makes no difference but there is one:

    It means when you add a new property, you will need to add a comma AND the property, which is not only more work, but will result as 2 line changes in VCS (git).

    const person = {
    age: 30,
    - height: 180
    + height: 180,
    + pulse: 60,
    }

    instead of

    const person = {
    age: 30,
    height: 180,
    + pulse: 60,
    }

Ok, now what?

Ok so you have setup types, lint and formatting.

But you have to fix lint and prettier errors all the time and your productivity is taking a nose dive.

Oh but wait, there are commands you can run that will fix all linting errors and pretty your code? That’s really nice but only if you didn’t have to manually run these commands…

Automated ways of linting and prettying

Now if you’re smart (or lazy like me) you can just configure some tool to do this tedious job for you.

Some of the options are:

  1. Configure your IDE to run this on save
  2. Using onchange
  3. Introduce a pre-commit hook

Ideally, you want to run lint error fixing formatting on every save, but if your IDE or machine does not support this, you can run it automatically prior to every git commit command.


Ok, now you are ready and probably very eager to go write some code, so please do so, but come back for chapter 2, because there are important things to do after writing some code.

Or if you prefer TDD, jump straight to chapter 2.

Chapter 2: tests

So you have written and committed some nicely linted and formatted code (or you prefer writing tests first).

That is amazing, but is it enough?

Simply put, no.

It might look like a waste of time, and a tedious task, but tests are important, mmkay?

Mr Mackey from South Park with the caption Test are important Mmkay

So why is having tests important?

  1. Ensures code quality and correctness: Automated tests serve as a safety net, allowing you to validate the functionality and behavior of your code. By running tests regularly, you can catch bugs, errors, and regressions early in the development process, preferably locally, even before you push them upstream!
  2. Facilitates code maintenance and refactoring: As projects evolve, code often needs to be modified or refactored. Automated tests provide confidence that the existing functionality remains intact even after changes are made. They act as a safeguard, helping you identify any unintended consequences or introduced issues during the refactoring process.
  3. Encourages collaboration and serves as documentation: When multiple developers work on a project, automated tests act as a common language and specification for the expected behavior of the code. They promote collaboration by providing a shared understanding of the system's requirements and functionality. Also, since tests can be named whatever we want, we can use this to our advantage to describe what is expected from some component that might not be that obvious.
  4. Reduces time and effort in the long run: While writing tests requires upfront investment, it ultimately saves time and effort in the long run. Automated tests catch bugs early, reducing the time spent on manual debugging.
  5. Enables continuous integration: Since tests serve as some sort of a contract description, we can now make changes in functionality while asserting and validating if have broken their contract towards other components. They enable continuous integration by providing a reliable filter for potential bugs and unwanted changes in behavior. Developers can quickly detect any issues introduced by new code changes, allowing for faster iteration and deployment cycles.

Writing code without tests is like walking a rope without a safety net. Sure, you may get across, but failing might be catastrophic.

Let’s say that we have some complex and unreadable function but we have a test for it:

function getDisplayName(user: { firstName: string; lastName: string }): string {
let displayName = '';

for (let i = 0; i < user.firstName.length; i++) {
displayName = displayName.concat(user.firstName.charAt(i));
}

displayName = displayName.concat(' ');

for (let i = 0; i < user.lastName.length; i++) {
displayName = displayName.concat(user.lastName.charAt(i));
}

return displayName;
}
describe('getDisplayName', () => {
// because we can name these tests, we can describe what the code should be doing
it('should return user\'s full name', () => {
const user = { firstName: 'John', lastName: 'Doe' };
const actual = getDisplayName(user);

expect(actual).toEqual('John Doe');
});
});

Now we are able to refactor the function while being confident that we didn’t break anything:

function getDisplayName(user: { firstName: string; lastName: string }): string {
// test will fail since we accidentally added a ,
return `${user.firstName}, ${user.lastName}`;
}

Now you see how tests not only assert the desired behavior, but they can and should be used as documentation.

There is a choice of test types you could introduce to help you safely get across.

If you are unsure which might be the right ones for you, please check out this blog post by my colleague Sean Ferguson.

Ideally you should be using more than one type of tests. It is up for you to weigh and decide which fit your needs best, but once you do, it is very important not to cut corners and to invest into keeping a high coverage.

This is the most important investment in our codebase. It will pay the highest dividends and it will keep us safe from failing if we do this part well.

The simplest and fastest tests to write are unit tests, but they are often not enough, because they don’t assert that the users using our system are experiencing it as expected.

You can even use AI tools like Chat GPT to generate unit tests based on production code (although they will not be perfect every time).

This is done by using integration or e2e tests, albeit it takes longer to set them up and to write individual tests, it is often the better investment, since we can rely on them to cover our system from the perspective of anyone using it.

Ok, so you are convinced and you add a test suite which you will maintain. You also added a command to run tests, and you do so before committing your code. That is very nice but what if someone in the team doesn’t do the same? What if they commit and merge code without running tests? 😱

If only there is a way to automate this and make it public.

Chapter 3: tying it all together

Now all these enhancements make sense, and you feel pretty happy about them, but without any forcing functions that make running these mandatory, they don’t bring much value since there will be people bypassing them.

Luckily most code repositories like GitHub provide us with automated workflows that can make it very easy to automate and force these checks and not let code be merged if it doesn’t pass the necessary checks.

Now we can write a workflow that will check all of this for us!

A GitHub workflow that would install run linting, unit and e2e tests would look something like:

name: Linting and Testing

on: [pull_request]

jobs:
linting-and-testing:
runs-on: ubuntu-latest
steps:
- name: Cancel Previous Runs
uses: styfle/cancel-workflow-[email protected]
with:
access_token: ${{ github.token }}

- name: Checkout
uses: actions/checkout@v3 # or whatever is the highest version at the time

- name: Setup Node
uses: actions/setup-node@v3
with:
node-version: '18.12' # or whatever the latest LTS release is
cache: 'npm'

- name: Install dependencies
run: npm i

- name: Run ESLint check
run: npm run lint:ci # npx eslint "{src,tests}/**/*.ts"

- name: Run unit tests
run: npm run test

- name: Run e2e tests
run: npm run test:e2e

Can we code now?

Yes we can!

But as we said, preparation is half the battle.

The other, longer and harder part, is yet to come and it is paramount to stay disciplined, consistent and to keep it simple. It would be easiest to do so by practicing being pragmatic, having pride and maturity in your approach to work and having a mindset that helps not only yourself but others that you work with grow.

This is best explained by a dear and pragmatic colleague of mine, Stevan Kosijer, in a blog post series starting with Pragmatic Engineer’s Philosophy.

Conclusion

Although we might instinctively think that writing code is the most productive way to initially invest our time in a software development project, without proper setup that is almost never the case. Having confidence in your changes through having automated tests, having enforced rules we find useful and having consistent formatting will greatly impact the velocity and quality of our work.

If your project is integrating with an API, which most likely it is, my honest advice would be to use and SDK. However, if you want a high quality SDK that can be built and updated on demand, along with documentation, tests, and easy integration with your CI/CD pipeline, please check out our product and perhaps even schedule a demo at liblab.com.

← Back to the liblab blog

liblab is excited to be sponsoring APIWorld 2023 where you can join thousands of global technical leaders, engineers, software architects, and executives at the world’s largest and longest-running API & microservices event – in its 11th year!

The API world logo

This conference is running in-person at the Santa Clara Convention Center, and online a week later. We will be there, both in person and online, so come and meet us and learn about how liblab can generate better SDKs for your APIs!

Get a free SDK

liblab is currently in beta, but if you want to skip the queue and get early access, talk to us at APIWorld. We'll be granting early access to everyone at the event.

We'll also be on hand to review API specs, and generate a high quality, human readable SDK for your API. You can then see how your developer experience is improved by a good SDK. Just leave us your email address and a link to your API spec at our booth, and we'll send you a copy of your SDK.

Learn from our experts

On our booth you will find some of the worlds finest (in our opinion) OpenAPI experts, who will be able to discuss your API and help you to produce the best API spec possible that will allow you to quickly generate high quality SDKs. We can talk you through some common problems, as well as best practices for API design. If you want a sneak preview of our expertise, check out our why your OpenAPI spec sucks post from Sharon Pikovski.

We also want to learn from you! We'll give you the chance to vote on your favorite SDK languages, and share your stories of the best and worst SDKs you've used. If you're up for it we'd love to share your tales on our YouTube channel.

I'll also be giving a demo-heavy session called From APIs to SDKs: Elevating your Developer Experience with automated SDK generation where I will talk through why SDKs are better for your customers than accessing APIs directly (yup, they really are). I'll also show how you can automate the process of generating SDKs by integrating liblab into your CI/CD pipelines. There will be plenty of code on show and resources to help you re-create the demos yourself. I'll be speaking on Thursday 26th October at 2:30pm in the Expo Hall.

A picture of Jim on a stage at a conference standing next to a podium with a laptop on it. Jim is wearing a black t-shirt and is working on the laptop

More details on the APIWorld session page.

Meet the team

We are busy preparing for our presence in the expo hall at the event. Literally - half of my home office is full of booth bits 😁. We'll be there to talk APIs and SDKs, with a load of demos showing how you can use liblab to quickly generate SDKs, and implement this SDK generation into your CI/CD pipelines.

As expected, we'll have some swag to give away - in our case, edible swag! I'm personally not a fan of a lot of conference swag, we all have our fill of cheap pens, USB cables that break, notebooks, and terrible mugs, and a lot of this ends up in landfill. To be more sustainable, we'd rather give you something that leaves a more pleasant taste in your mouth, literally. Come and see us to find out more!

We'll also have some stickers, after all, who doesn't love stickers?

2 liblab stickers on a wooden table. One has the liblab logo, a simple line drawn llama face with curly braces for the side of the head, and liblab.com, the other has a version of the liblab llama logo with hearts for eyes and the caption love your SDK

We'll be available on a virtual booth during the online event, so if you can't make it to Santa Clara, you can still come and meet us online. No stickers or edible swag at the virtual event though, sorry!

Meet the llama

You may also get the chance to meet a real life* llama 🦙. Snap a pic with our llama and tweet it with the hashtag #liblabLlama and tag @liblaber to get a special sticker!

A sticker with a llama mascot and the text I met the liblab llama

* This is not actually true, it's Sean in a llama costume.

See you there - on us!

We have a number of open tickets to give away for the in-person and virtual events with access to the expo hall and some of the sessions. If you want to come meet us, then sign up for our beta and we'll send you a ticket. We'll be giving away tickets on a first come, first served basis, so don't delay!

Otherwise, head to apiworld.co to get your tickets now. We can't wait to meet you!

← Back to the liblab blog

Yep you heard it here first. I got beef with the testing pyramid and I’m going to tell you what’s wrong with it. Also what you should be doing instead. But first to outline the discussion what is it that we are trying to achieve by writing tests? Hopefully we’ve all heard you should write tests (and if you haven’t YOU SHOULD WRITE TESTS), but this is often stated as a dogma and not really explained. So let’s start from a simpler time before I was ranting about testing strategies and consider the question:

Why did the first person to start writing tests do it?

Their boss was yelling at them for breaking the product again, and they’d now been back and forth fixing issues QA found for weeks. So they decided to write code that verified their other code worked. Fast forward a little bit while that guy tried some stuff and improved his testing practices and we see a few different things accomplished by his efforts:

  1. Less manual testing required
  2. Enable continuous deployment
  3. Speed up development lifecycle
  4. Catch regression early
  5. Document behavioral decisions

Types of Tests

So those are our goals how best do we go about achieving them? Let’s start by seeing how different types of tests help accomplish those goals. Notably I’m only going to consider user facing software as library development comes with it’s own set of concerns that don’t match all of this exactly. For simplicity I’m going to split them into 3 categories.

  • Unit tests which attempt to test a specific piece of code and make heavy use of mocking for dependencies in order to achieve isolation.
  • Integration tests which attempt to test an arbitrary grouping of components with the goal to minimize required mocking, but do not attempt to act as a user.
  • End-to-end (E2E) tests which attempt to impersonate a user as they use your system in different ways.

How does each type of test help us accomplish our objectives?

Unit Tests

First let’s consider unit tests. Because unit tests are code driven tests and not based on any particular user action they don’t really save us manual QA or enable continuous deployment. We still need a manual testing cycle to ensure that the components are hooked up together correctly no matter how many unit tests we write.

We also can’t usually use them to document decisions about the systems behavior because individual components rarely contain the entirety of the logic for a particular feature.

The jury is a little more split on speeding up the development lifecycle and catching regressions early. When refactoring within an individual component they often accomplish both of those goals quite well, but if your refactor moves logic from one component to another it can be a productivity drag to also move and refactor the tests as well.

Integration Tests

Integration tests can be a hit or miss depending on how good a job you do of identifying your arbitrary groups. Since these are still code based tests and not generally based on user flows we aren’t going to replace manual QA, but if your groupings are well designed you can mitigate certain scenarios.

Consider the example of an API endpoint when tested all together. This would allow you to test for many odd edge cases around filtering and such, but wouldn’t let you verify that filtering on the frontend works. So it helps a little with manual QA, but not a ton.

Same story for continuous deployment. These also tend to speed up the development lifecycle because you can easily check if you broke anything by running them and they tend to be fast enough to run on a local developers machine without issue. Same story for catching regressions early, and documenting behavioral decisions.

E2E tests

That leaves us with E2E tests. Since E2E tests simulate actual user actions they can reasonably replace a manual QA scenario and it’s not hard to imagine that with enough of them we wouldn’t feel the need to manually QA our changes. They also enable continuous deployment, but with a bit of a downside that almost all E2E frameworks introduce flakiness into your tests. So they do enable continuous deployment on success, but they require constant vigilance against flakiness.

They generally speaking don’t speed up development because typically (although not always) the setup is a little too complex and/or slow to run easily on a developer machine. They do a fantastic job of catching regressions and documenting behavior because the scenarios are evocative of actual bugs as reported by customers.

E2E tests are also a great way to test and monitor for regressions of your APIs performance. Check out our Understanding API Performance Metrics blog post by liblab engineer Olufemi Thompson to learn more.

How do different test types help us?

So for those keeping track here’s how each type of test stacks up with our 5 goals:

Test TypeUnitIntegrationE2E
Save Manual TestingNoSometimesAlways
Enable continuous deploymentNoSometimesAlways
Speed up developmentSometimesYesNo
Catch regressionsSometimesYesAlways
Document behavioral decisionsRarelySometimesAlways

So based on this we can come to some conclusions about when to write each kind of test. Unit tests should be reserved for when the unit they are testing is isolated and complicated enough that it speeds up development. Integration tests should be our general default style of testing because they can actually help with all of our goals. E2E tests should be used for replacing manual QA steps and documenting odd behaviors as they generally do everything we want, but at the cost of slowing down development.

So our ideal test suite will consist of some unit tests for especially complicated pieces, E2E tests for specific scenarios we would have otherwise manually QA’d, and everything else would be tested with integration tests.

Down with the test pyramid!

Now this leads us to my beef with the Testing pyramid. For those unaware the testing pyramid says that we should have mostly Unit tests with a smaller set of integration tests and an even smaller set of e2e tests (like a pyramid 🙂). This means that most of your tests only accomplish at most 2 of our 5 goals. This is a ton of wasted effort and leads to people writing tests like this:

// code under test
import db from './db';
const getUsers = (req, res) => {
res.send(await db.users.findAll());
};

//test file
describe("getUsers", () => {
it("stubs everything into oblivion", () => {
usersStub = stub();
stub(db, 'users').returns(usersStub);
getUsers(stub(), stub());
expect(usersStub.findAll).to.be.calledOnce;
})
})

Hopefully the problems with testing like this immediately jump out at you. This test accomplishes 0 of our 5 goals. It does not prevent someone from having to manual QA this. It doesn’t make refactoring this code in the future any easier because any actual change to the code would absolutely require this test to be rewritten. It just rewrites the code, but using stubs instead of code.

In conclusion, unit tests should be used sparingly and only when the unit in question is important enough to have its own isolated logic. E2E tests should be used to help your poor QA team keep up with all the code you are pushing out. Everything else should be integration tested. And then once you write those brilliantly integration tested APIs you can completely skip writing both code and tests for your sdk’s by asking liblab to generate them for you!